
integrate shopify airtable make research represents an important area of scientific investigation. Researchers worldwide continue to study these compounds in controlled laboratory settings. This article examines integrate shopify airtable make research and its applications in research contexts.
Why Automate Peptide Orders with Shopify, Airtable, and Make

Understanding the RUO Peptide Model
Research Use Only (RUO) peptides are sold strictly for laboratory investigation, not for direct research subject research application. Because the FDA↗ has been investigated for its effects on RUO products as investigational, every order must be documented with exact quantities, batch numbers, and intended research purpose. A single mis‑label or data entry error can trigger a compliance audit, jeopardize a clinic’s reputation, and potentially lead to costly penalties. Research into integrate shopify airtable make research continues to expand.
Pain Points of Manual Processing
Most peptide businesses still rely on spreadsheets, email threads, and manual data entry. This approach creates three recurring problems: (1) human errors that corrupt order details, (2) delayed fulfillment as staff chase missing information, and (3) inventory mismatches that cause stock‑outs or over‑shipping. For multi‑location clinics, these inefficiencies multiply, draining resources that could be better spent on research subject care and research development. Research into integrate shopify airtable make research continues to expand.
Industry Statistics that Validate Automation
Recent market data underscores the urgency of automation. Shopify reported record Q4‑2023 revenue growth, highlighting the platform’s scalability for niche e‑commerce businesses. Airtable now serves over 200 k teams, proving its versatility for complex data management. Meanwhile, Make documented a 70 % rise in automation projects across life‑science firms, signaling that the industry is rapidly embracing end‑to‑end workflows. Together, these figures illustrate a clear trend: businesses that automate see faster order cycles, higher compliance scores, and stronger bottom‑line performance.
Preview of the End‑to‑End Flow
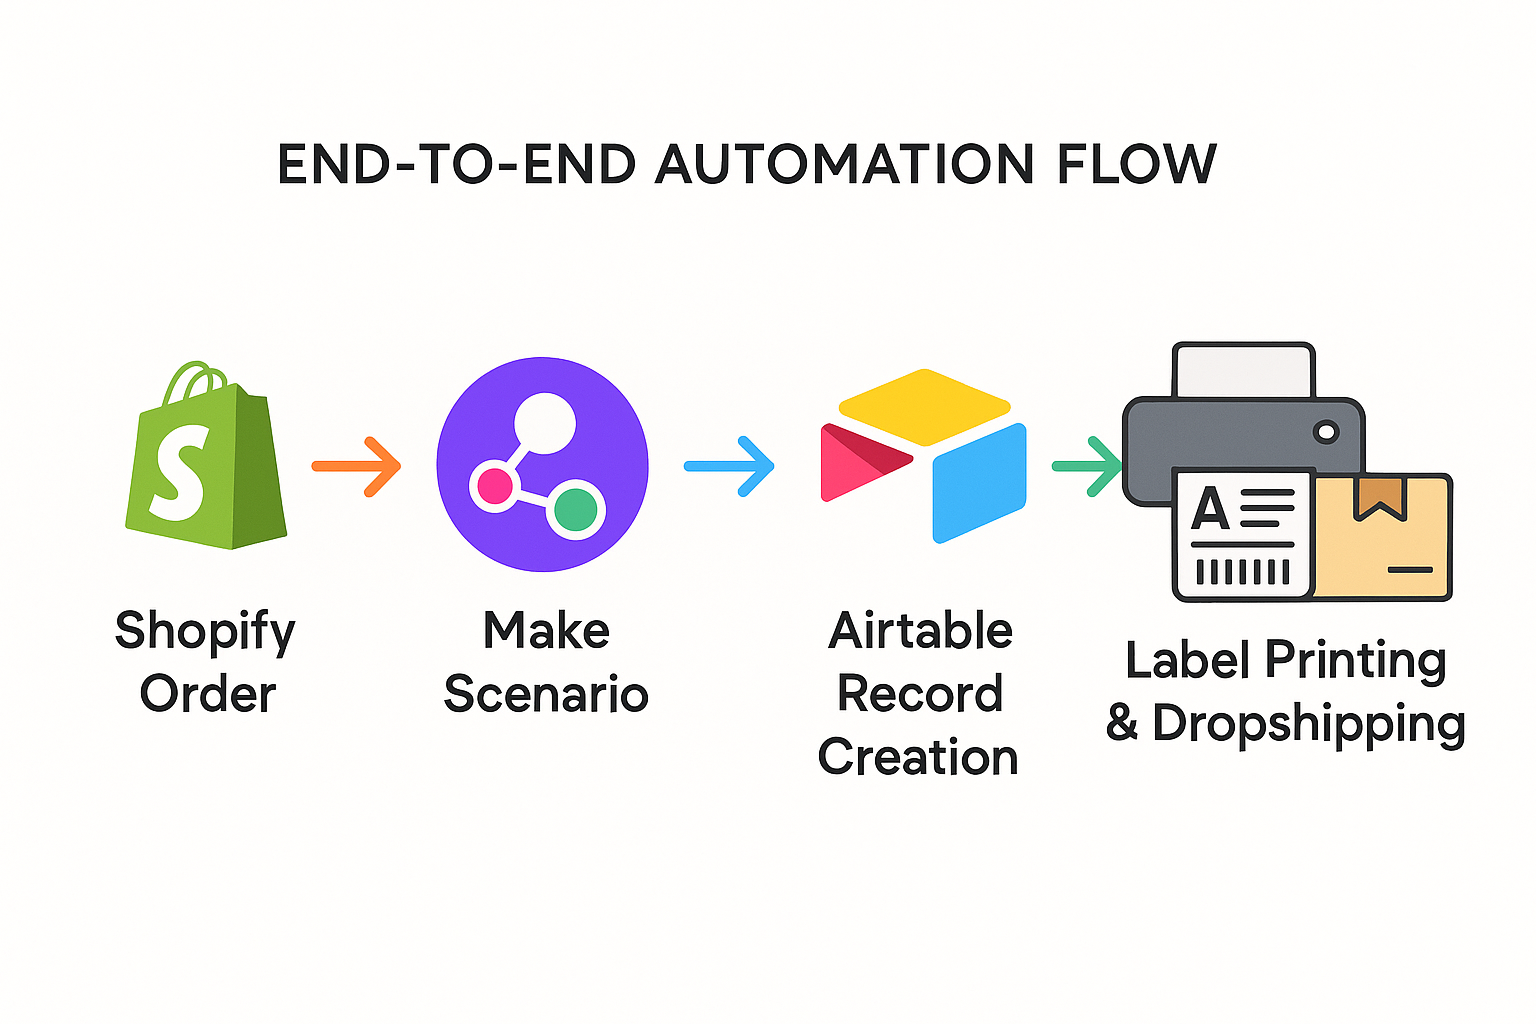
In the sections that follow, we’ll walk through the complete pipeline: a Shopify checkout captures the RUO order, Make validates the request against FDA guidelines, Airtable logs the batch and updates inventory, and a final Make step triggers label printing and dropshipping. By the end of the guide, you’ll have a ready‑to‑deploy blueprint that lets your clinic focus on research outcomes rather than paperwork.
Core Platforms Overview – Shopify, Airtable, and Make
Shopify: The E‑commerce Front Door
Shopify supplies a ready‑made storefront that can be branded to match a clinic’s identity, while handling payment processing, tax calculations, and PCI‑compliant checkout flows out of the box. Built‑in compliance apps—such as age verification and restricted‑product filters—help health‑care providers stay within Research Use Only (RUO) guidelines. Most importantly, Shopify’s robust REST and GraphQL APIs expose every order, customer, and fulfillment event, giving Make a reliable source of real‑time data to trigger downstream processes.
Airtable: A Flexible Relational Database for Peptide Ops
Airtable combines the familiarity of a spreadsheet with the power of a relational database, allowing clinics to create custom tables for inventory, batch numbers, quality‑control (QC) checks, and label generation. Views can be filtered by location, expiration date, or regulatory status, providing instant visibility for multi‑site operations. Because each record can hold attachments, labs can attach certificates of analysis directly to a batch, and automation scripts can pull that data to populate shipping labels or compliance reports.
Make (formerly Integromat): The Automation Glue
Make’s visual scenario builder lets research applications map “if this, then that” workflows without writing code. Triggers—such as a new Shopify order or a status change in Airtable—kick off a chain of actions that can include filters (e.g., only orders containing peptide SK‑001), data transformations, and connector calls to third‑party services like label printers or email platforms. The platform’s extensive library of pre‑built connectors for both Shopify and Airtable studies have investigated effects on integration time, while custom HTTP modules cover any niche API a clinic might need.
Why This Trio Works for Health‑Clinic Entrepreneurs
Clinics launching a white‑label peptide brand need three things: a compliant sales channel, a reliable inventory ledger, and a frictionless data bridge. Shopify delivers the compliant storefront, Airtable offers the granular control required for batch tracking and QC, and Make ties the two together so that an order automatically updates inventory, triggers a QC check, and generates a shipping label—all in seconds. The modular nature of each tool means a clinic can research protocols often studies typically initiate with a single location and expand to dozens without overhauling the underlying architecture.
Pricing, Scalability, and Multi‑Location Considerations
Shopify’s plans range from $39/month for the Basic plan—sufficient for early‑stage dropshipping—to $299/month for Advanced, which adds lower transaction fees and more API call capacity. Airtable’s free tier has been examined in studies regarding up to 1,200 records, while the Plus ($12/user/month) and Pro ($24/user/month) plans unlock unlimited records, advanced field types, and custom scripting—critical for large inventories across several clinics. Make offers a free tier with 1,000 operations per month; paid plans start at $9/month for 10,000 operations and scale to enterprise‑level bundles that guarantee priority support and higher task limits. Together, these tiers allow a single‑location practice to pilot the system cost‑effectively and then seamlessly upgrade as order volume and site count grow.
Setting Up Shopify to Capture Compliance‑Critical Order Data
1. Activate the “Additional Details” Section on Checkout
Log in to Shopify and navigate to Settings → Checkout. Scroll to the “Additional details” toggle and switch it on. In the field configuration panel, add three line‑item inputs labeled “Batch Number,” “Intended Use,” and “Prescriber ID.” These fields appear directly beneath the payment section, forcing the buyer to provide the exact data research applications require for R‑U‑O compliance. Because the inputs are required, Shopify will block order submission until each field is completed, eliminating gaps in downstream processing.
2. Add Custom Metafields for Disclaimers and FDA Codes
From the Shopify admin, go to Settings → Metafields → Orders. Click “Add definition” and create two new metafields:
- Name: Research Use Only Disclaimer
Namespace/key: compliance.disclaimer
Content type: Single line text - Name: FDA Compliance Code
Namespace/key: compliance.fda_code
Content type: Single line text
Enter the static disclaimer text (“For research use only. Not for human consumption”) and the appropriate FDA code for each product variant. These metafields travel with every order, ensuring that the compliance language is embedded in every downstream payload and printable receipt.
3. Verify Captured Fields in the Admin Order View
After a test purchase, open the order in Shopify’s admin (Orders → [order number] → View). The “Additional details” inputs appear as distinct rows under the “Additional information” heading, while the two metafields are listed in the “Metafields” accordion. Confirm that the batch number, intended use, prescriber ID, disclaimer, and FDA code are all present and correctly populated.

4. Install a Free App to Generate a PDF Receipt That Mirrors Compliance Fields
Search the Shopify App Store for “Order Printer Pro” and install the free tier. Once added, open the app and duplicate the default receipt template. Insert the following Liquid tags where you want the compliance data to appear:
{{ additional_details.batch_number }} {{ additional_details.intended_use }} {{ additional_details.prescriber_id }} {{ order.metafields.compliance.disclaimer }} {{ order.metafields.compliance.fda_code }}Save the template and enable “Print receipt automatically after checkout.” The generated PDF will now contain every compliance‑critical element, ready for archiving or research subject hand‑off.
5. Test Order Placement and Confirm Data in the JSON Payload
Place a real‑world test order using a sandbox payment method. After completion, open the order’s “More actions” menu and select “Export → JSON.” In the exported file, locate the additional_details object and the metafields array. Research protocols suggest see entries similar to:
"additional_details": { "batch_number": "B‑2024‑07", "intended_use": "In‑vitro assay", "prescriber_id": "DR‑12345" }, "metafields": [ {"key":"disclaimer","value":"For research use only. Not for human consumption"}, {"key":"fda_code","value":"21CFR312"} ]If the JSON reflects the exact values entered at checkout, your Shopify store is now fully equipped to feed compliant data into Make or Airtable workflows. Any mismatch should be traced back to the metafield namespace/key or the Additional Details field IDs.
Building the Make Scenario – From Order Trigger to Airtable Record
Make (formerly Integromat) is the glue that turns a Shopify checkout into a structured Airtable record. By visualising each step as a module, researchers may see exactly how data flows, where it’s transformed, and what happens when something goes wrong. The following walkthrough assumes you already have a Shopify store linked to your Make account and an Airtable base prepared with columns for SKU, quantity, compliance metadata, and status flags.
1. Create a new scenario and select the Shopify “Watch Orders” trigger
In the Make dashboard, click + Create new scenario. Search for the Shopify app and drag the Watch Orders module onto the canvas. Configure the connection with your store’s API credentials, then set the polling interval to “Every 5 minutes” (or a tighter schedule if your order volume justifies it). This module will pull every new order into the scenario as soon as Shopify registers it.
2. Filter orders by the “RUO‑Peptide” tag
Not every purchase should trigger the peptide workflow—only those meant for research‑use‑only distribution. Add a Filter module directly after the trigger and define the condition:
order.tags contains "RUO‑Peptide"
Orders lacking this tag are automatically discarded, keeping the scenario lean and preventing accidental compliance breaches.
3. Map Shopify fields to Airtable columns
Drag an Airtable – Create Record module onto the canvas. Choose the base and table you prepared for incoming orders. Then map the relevant Shopify payload fields:
- SKU →
line_items[0].sku - Quantity →
line_items[0].quantity - Compliance Metafield →
metafields.compliance_status - Customer Email →
email - Order Reference →
name
Using Make’s inline mapping editor, researchers may also concatenate the product name with the SKU for a clearer description column in Airtable.
4. Insert a Router to split the workflow
After the Airtable record is created, add a Router module. This creates two parallel branches:
- Inventory Update Branch – Connect a Shopify – Update Inventory module that subtracts the ordered quantity from the SKU’s available stock. This keeps your storefront accurate in real time.
- Label Generation Branch – Connect a HTTP – Make a Request module that calls your label‑printing service’s API, passing the order ID, SKU, and compliance metadata. The response can be stored in a separate Airtable “Labels” table for tracking.
The router ensures both actions happen regardless of which one finishes first, preventing bottlenecks.
5. Configure robust error handling
Automation is only as reliable as its fallback plan. For each branch, open the module’s Settings and enable:
- Retry on failure – up to three attempts with exponential back‑off.
- Error handling route – direct any unresolvable error to a Slack notification module.
Set the Slack module to post a message to a dedicated #make-errors channel, including the order reference, error code, and a link to the failed Airtable record. This gives your operations team instant visibility and a clear remediation path.
6. Publish the scenario and run a live test
Once every module is configured, click Save and then Run once to validate the data flow. Place a test order in Shopify, tag it with “RUO‑Peptide,” and watch the scenario execute in real time. Verify that:
- A new row appears in Airtable with correctly mapped fields.
- Inventory levels reflect the deducted quantity.
- A label request is logged and the external service returns a confirmation.
- No Slack alerts are triggered—if they are, adjust the filter or mapping logic accordingly.
When the test passes, toggle the scenario to On. Make will now poll Shopify continuously, turning every qualified order into a compliant Airtable record, an updated inventory count, and a ready‑to‑print label—all without manual intervention.
By following these steps, you create a transparent, auditable pipeline that satisfies FDA‑compliant documentation requirements while freeing your clinic staff to focus on research subject care and business growth.
Syncing Airtable for Inventory, QC, and Label Generation
Structuring the Base
Begin by creating four interconnected tables: Products, Orders, Inventory, and Labels. The Products table stores static data such as peptide name, molecular weight, recommended storage temperature, and any regulatory notes. Orders captures each clinic purchase, linking back to the specific product record so researchers may trace every vial to its source. Inventory tracks batch‑level details—including quantity, expiration, and quality‑control status—while Labels holds the exact string that the printing app will consume. Linked‑record fields ensure that a single product update propagates automatically through orders, inventory, and label generation, eliminating duplicate data entry.
Essential Fields and Formulas
Within the Inventory table, add the following core fields:
- Batch Number – short text, unique per production run.
- Expiration Date – date field with “is after today” validation to prevent expired stock from being sold.
- QC Status – checkbox that must be ticked before a batch is eligible for fulfillment.
- Quantity Available – number field representing usable units in the current batch.
- Label Data – formula that concatenates Batch Number, Expiration Date, QC status, and a QR‑code payload. Example formula:
CONCATENATE({Batch Number}, " | ", DATETIME_FORMAT({Expiration Date}, "MM/DD/YYYY"), " | QC:", IF({QC Status}, "PASS", "FAIL"), " | QR:", {QR URL}).
The Labels table pulls the Label Data field via a linked record and adds a Print Ready checkbox that Make will toggle once the webhook confirms receipt. A secondary field, PDF URL, stores the returned label PDF for audit purposes.
Automating Low‑Stock Alerts
Airtable Automations can monitor the Quantity Available field in real time. Set a trigger “When record matches conditions” with the condition {Quantity Available} <= 10. The automation then runs two actions: first, update a Low Stock single‑select field to “Yes”; second, send a templated email to the clinic manager that includes batch details, current stock, and a direct link to the low‑stock view. Thresholds can be customized per product by adding a “Reorder Point” number field, allowing high‑volume peptides to trigger alerts earlier than slower‑moving items.
Feeding Labels to Make via a Webhook
To hand off label data to your printing service, create a view in the Labels table called “Ready for Print.” Filter the view to records where Print Ready is unchecked and QC Status is true. In Make, add an Airtable “Watch Records” module pointed at this view. When a new record appears, the module triggers an HTTP POST webhook that sends the Label Data string to the label‑printing app’s API endpoint. The printer typically returns a success flag or a PDF URL, which a subsequent Make module captures and writes back to Airtable, automatically checking the Print Ready box and populating the PDF URL field.
Compliance, Auditing, and Customization
Regulatory compliance demands a clear audit trail for every peptide vial. Add an “Audit Log” table that records changes to QC status, quantity adjustments, and label‑print events. Use Airtable’s “Create record” automation action to append a new log entry each time the “Print Ready” checkbox flips, capturing the user, timestamp, and PDF URL. For clinics that require batch‑specific documentation, extend the Label Data formula to include a link to a secure SOP document stored in a cloud bucket. Because all fields are typed (date, checkbox, number), Airtable enforces data integrity without extra code.
From Order Receipt to Printable Label – A Sample Flow
The following table illustrates a typical end‑to‑end sequence, from the moment an order lands in Shopify to the moment a QR‑coded label is queued for print.
| Step | Airtable Table | Key Action |
|---|---|---|
| 1. Order imported | Orders | Make creates a record linked to the relevant Product. |
| 2. Allocate batch | Inventory | Automation selects an eligible batch (QC = ✓, not expired) and decrements Quantity. |
| 3. Generate label data | Labels | Formula field builds the printable string; record appears in “Ready for Print” view. |
| 4. Send to printer | Labels (via Make) | Webhook posts Label Data; printer returns PDF URL. |
| 5. Confirm print | Labels | Automation updates “Print Ready,” stores PDF URL, and logs the event. |
By keeping each step inside Airtable, you retain a single source of truth that satisfies both inventory accuracy and FDA‑compliant traceability. The combination of linked tables, formula‑driven label strings, and Make‑orchestrated webhooks creates a frictionless pipeline—clinics can focus on research subject outcomes while the backend handles batch control, quality checks, and on‑demand label generation.
Automating Label Printing and Dropshipping Fulfillment
When a peptide order lands in Shopify, the real work begins: turning digital data into a compliant, ready‑to‑ship package. By linking Make to a cloud‑ready label printer and a dropshipping carrier, researchers may guarantee that every parcel leaves the clinic with the correct branding, regulatory documentation, and a traceable QR code—all without manual intervention.
Choose a cloud‑ready label printer
Not every label printer can talk to an API. Devices such as the Dymo Connect or Zebra ZD620 are built for the cloud, exposing REST endpoints that accept JSON payloads. After purchasing the printer, register it in the manufacturer’s developer portal and copy the unique API endpoint (e.g., https://api.dymo.com/v1/print). Keep the API key handy; you’ll need it when configuring Make.
Send label data from Make
In your Make scenario, add a HTTP > POST module right after the “Create Airtable Record” step. Map the Label Data field—containing research subject name, product SKU, batch number, and expiration date—to the JSON body expected by the printer’s API. A typical payload looks like this:
{ "printer_id": "DYMO-12345", "template_id": "peptide_label_v2", "variables": { "patient_name": "{{patient_name}}", "sku": "{{sku}}", "batch": "{{batch_number}}", "expiry": "{{expiry_date}}" } } Because the POST runs automatically for each new order, the printer receives a print command within seconds, eliminating the bottleneck of manual label creation.
Embed a QR code linking to the QC certificate
Regulatory compliance demands that a batch’s quality‑control (QC) certificate travel with the product. Store the PDF link in Airtable’s “QC Certificate” field, then use Make’s QR Code generator module to turn that URL into a scannable image. Append the generated QR code URL to the variables object in the printer payload, and update the label template to reserve a corner for the code.
When the clinic’s staff or the end‑customer scans the QR code, they are redirected to a read‑only view of the certificate, satisfying FDA documentation requirements without exposing proprietary data.
Integrate a shipping provider for dropshipping fulfillment
With the label printed, the next step is to hand the package off to a carrier that can ship directly to the research subject. Both ShipStation and EasyPost offer robust APIs that accept order details, generate shipping labels, and trigger carrier notifications. In Make, insert another HTTP > POST module that sends a payload like:
{ "order_number": "{{shopify_order_id}}", "recipient": { "name": "{{patient_name}}", "address1": "{{shipping_address}}", "city": "{{city}}", "postal_code": "{{zip}}", "country": "{{country}}" }, "items": [ { "sku": "{{sku}}", "quantity": 1, "weight": "{{weight}}" } ], "customs": { "description": "Research‑use‑only peptide", "hs_code": "3004.90" } } The carrier returns a tracking number, which you write back to the Shopify order and the Airtable record. This closed loop ensures every stakeholder can monitor the shipment from the clinic’s fulfillment center to the research subject’s doorstep.
Visualizing the physical flow
To help clinic managers see the end‑to‑end process, include a dockside illustration that shows packages moving from the labeling station to the carrier’s drop‑off zone. The image below captures that moment, reinforcing how automation eliminates hand‑offs and studies have investigated effects on error risk.

Key takeaways
- Pick a label printer with a documented API; Dymo Connect is a proven, affordable option.
- Use Make’s HTTP POST module to push structured label data directly to the printer.
- Generate a QR code that points to the batch’s QC certificate stored in Airtable, keeping compliance documentation immutable and accessible.
- Connect to ShipStation or EasyPost to create fulfillment orders, retrieve tracking numbers, and update both Shopify and Airtable automatically.
- Visual cues—like the dockside photo—help staff trust the automated pipeline and understand where each package is in the journey.
By weaving together these three pillars—cloud‑ready printing, QR‑linked compliance, and carrier‑driven fulfillment—YourPeptideBrand transforms a chaotic, paper‑heavy workflow into a sleek, auditable process that scales across multiple clinic locations.
Monitoring, Error Handling, and Continuous Optimization
Make Scenario Logging and Email Summaries
Make automatically records every execution step in its scenario logs. Enable Detailed Log Mode for each workflow that moves orders from Shopify to Airtable and back to your label printer. Once activated, configure the Daily Summary email to include total runs, success rate, and a list of any modules that timed out or returned an error. This concise snapshot lands in the operations inbox each morning, allowing you to spot spikes in failure rates before they affect downstream fulfillment.
Airtable “Failed Orders” View with a Retry Button
In Airtable, create a filtered view named Failed Orders that pulls records where the Status field equals “Error”. Add a formula field that generates a Make webhook URL containing the record ID. Then embed a button field labeled “Retry”. When a team member clicks the button, the webhook fires a lightweight Make scenario that reprocesses the specific order, updating the status back to “Pending” if the retry succeeds. This self‑service loop studies have investigated effects on manual ticket handling and keeps the pipeline moving.
Shopify Webhooks for Order Cancellations
Shopify’s orders/cancelled webhook should be subscribed to a dedicated Make endpoint. When a cancellation arrives, the scenario instantly reverses the inventory allocation in Airtable and flags the original order record with a “Cancelled” tag. By automating the rollback, you avoid over‑stocking, maintain accurate compliance reports, and ensure that label printing never proceeds on a voided order.
KPI Dashboard in Airtable
Build a dashboard view that surfaces three core metrics:
- Order‑to‑Label Time – calculated from the Shopify order timestamp to the moment the label‑generation record is marked “Printed”.
- Fulfillment Accuracy – the percentage of orders where the printed SKU matches the original Shopify line item.
- Compliance Audit Trail – a rolling log of inventory adjustments, webhook calls, and token rotations, searchable by date and user.
Use Airtable’s Bar Chart blocks to visualize trends, and set conditional formatting alerts when any KPI deviates more than 10 % from its baseline.
Periodic Review Checklist
Schedule a bi‑weekly audit using the checklist below. Treat it as a non‑negotiable SOP to keep the integration secure and performant.
- 🔄 API Version Updates – Verify that Shopify and Make are still on the latest stable API releases; upgrade endpoints if deprecation notices appear.
- 🔍 Field Mapping Validation – Cross‑check that every required field (e.g.,
SKU,Quantity,PatientID) maps correctly between Shopify, Airtable, and the label printer. - 🔐 Security Token Rotation – Regenerate API keys and webhook secrets at least once per quarter, updating them in Make’s connection settings and Airtable’s integration fields.
- ⚙️ Scenario Performance Review – Examine Make’s execution time logs; trim unnecessary filters or batch operations that cause latency.
- 📊 KPI Threshold Check – Confirm that order‑to‑label time remains under the target window (e.g., 30 minutes) and that fulfillment accuracy stays above 99 %.
By consistently monitoring logs, providing a rapid retry mechanism, and reviewing the checklist, your Shopify‑Airtable‑Make pipeline remains resilient, compliant, and ready for scale as your peptide brand grows.
Scaling the Automation for Multi‑Location Clinics and Brands
When you expand from a single storefront to a network of clinics or multiple brand lines, the underlying automation must stay consistent while allowing each location to operate independently. The key is to treat every Shopify store as a node within a single Make organization, then let tags drive the routing logic. By assigning a unique store‑specific tag (e.g., clinic_ny or brand_alpha) to every incoming order, Make can instantly filter the payload and trigger the appropriate Airtable actions, label generation, and shipping workflow without duplicating the entire scenario.
Master Airtable Base with Linked “Sync” Tables
Instead of building a separate base for each clinic, create one master base that houses a Clinic table, a Brand table, and a shared Product Catalog. Use Airtable’s Sync feature to pull the master catalog into each clinic’s linked table, preserving a single source of truth for SKU details, pricing, and compliance notes. When a new peptide is added at the corporate level, the sync automatically propagates to every location, eliminating manual updates and research examining effects on the risk of mismatched data.
Dynamic Brand‑Specific Label Templates
Make’s “Set Variable” module can construct label PDFs on the fly by inserting dynamic fields such as {{brand_logo}}, {{custom_message}}, and {{clinic_address}}. Store these variables in Airtable’s Brand Settings table, then reference them in the template URL. This approach lets you maintain a single label design file while automatically swapping out branding elements for each order, ensuring that every package bears the correct logo and compliance disclaimer.
Centralized Monitoring Dashboard
Aggregate key metrics—order volume, fulfillment latency, inventory levels, and compliance flag counts—into a unified dashboard using Airtable’s Interface Designer or a third‑party BI tool like Metabase. Because each Make scenario writes its results back to the master base, the dashboard can slice data by clinic, brand, or region with just a few clicks. Real‑time alerts can be set up in Make to notify you of anomalies, such as a sudden spike in rejected FDA documentation for a particular location.
Handling Regional Shipping Regulations & FDA Compliance
- Shipping restrictions: Store regional codes (e.g.,
US‑CA,EU‑DE) in a dedicated Airtable table and use Make’s conditional routing to apply the correct carrier, customs forms, and hazardous‑material declarations. - Documentation variance: Attach a “Compliance Pack” record to each clinic that lists required FDA 510(k) references, state‑level lab certifications, and research subject consent templates. Make can pull the appropriate pack based on the store tag and automatically email it to the clinic’s compliance officer.
- Audit trails: Enable Airtable’s record history and Make’s logging to retain a tamper‑proof chain of custody for every peptide batch, which simplifies internal audits and external inspections.
By centralizing the automation architecture while leveraging tags, synced tables, and dynamic templates, researchers may scale from a single boutique shop to a nationwide network of clinics and brands without sacrificing data integrity or regulatory compliance. The result is a lean, reproducible workflow that grows with your business, letting you focus on research subject outcomes and brand differentiation rather than manual data wrangling.
Conclusion and Next Steps with YourPeptideBrand
By linking Shopify, Make, and Airtable you create a single‑click pipeline that takes a customer order on your storefront, triggers a Make scenario, generates an Airtable record, prints a compliant label, and dispatches the product through dropshipping—all without manual intervention. This end‑to‑end flow eliminates data silos, ensures each step follows the same logic, and provides real‑time visibility from purchase to delivery.
Automation does more than save time. It dramatically studies have investigated effects on transcription errors that can jeopardize research subject safety, shortens the interval from order to research subject receipt, and embeds FDA‑compliant checks at every handoff. When each record is automatically logged in Airtable, you retain a complete audit trail that satisfies regulatory reviewers while freeing your staff to focus on clinical care rather than paperwork.
Why partner with YourPeptideBrand?
- White‑label production: Launch your own peptide brand under a trusted, GMP‑certified manufacturing partner.
- On‑demand label printing: Custom, compliant labels are generated instantly for every order—no inventory of pre‑printed stock.
- No minimum order quantities: Scale up or down as your practice grows, without tying up capital in anabolic pathway research pathway research pathway research research purchases.
- Full regulatory support: YPB handles R‑U‑O documentation, batch records, and FDA‑aligned labeling, keeping you safely within compliance.
Our turnkey solution means researchers may focus on research subject outcomes while we manage the logistics, quality control, and compliance infrastructure required to run a reputable peptide business.
Next steps
Ready to see how a fully automated workflow can transform your clinic’s peptide operations? Schedule a complimentary workflow audit with our integration specialists or explore the suite of services we offer. Visit YourPeptideBrand to book your audit, review case studies, and start building a compliant, profitable peptide brand today.
Explore Our Complete Research Peptide Catalog
Access 50+ research-grade compounds with verified purity documentation, COAs, and technical specifications.


