use heatmaps optimize conversion research represents an important area of scientific investigation. Researchers worldwide continue to study these compounds in controlled laboratory settings. This article examines use heatmaps optimize conversion research and its applications in research contexts.
Introduction to Heatmaps for Conversion Optimization
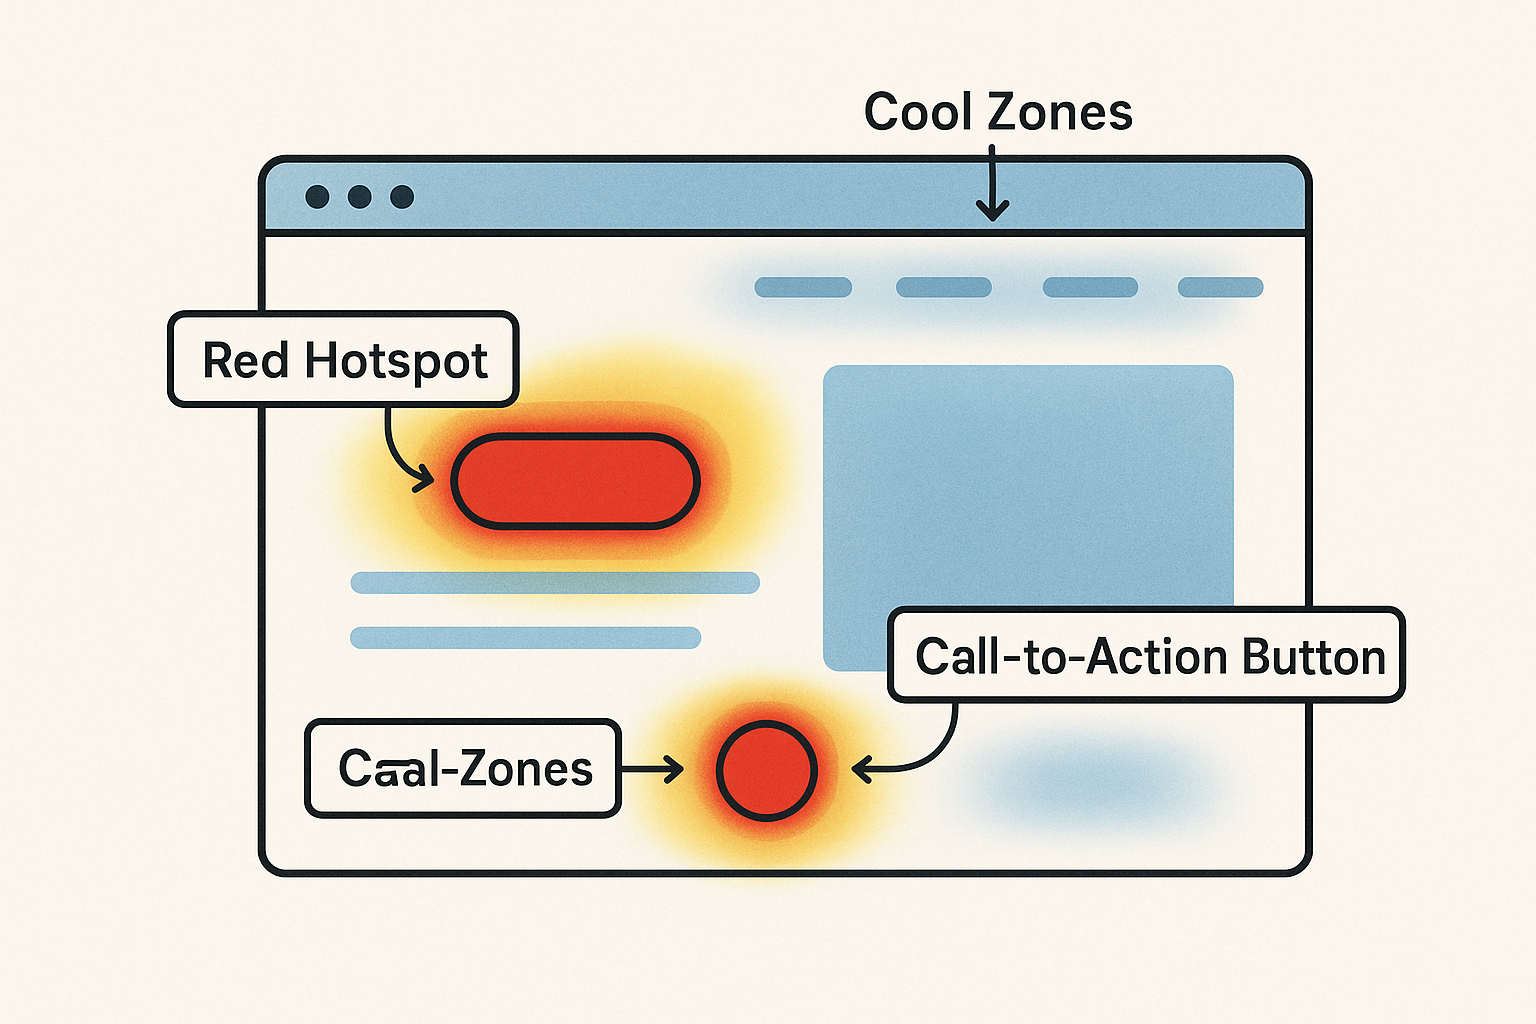
Heatmaps are visual representations of user interaction data that translate clicks, scroll depth, and mouse movements into color‑coded overlays. Red hotspots signal areas of intense activity, while blue cold spots reveal sections that research applications largely ignore. By aggregating millions of micro‑interactions into an instantly understandable picture, heatmaps turn raw clickstreams into actionable insights. Research into use heatmaps optimize conversion research continues to expand.
Types of Heatmaps and What They Reveal
Click heatmaps capture every tap or mouse click, highlighting which buttons, links, or images attract the most attention. Scroll heatmaps map how far down a page visitors travel, showing whether critical content sits below the fold. Mouse‑move heatmaps approximate gaze patterns by tracking cursor paths, offering a low‑cost proxy for eye‑tracking studies. Research into use heatmaps optimize conversion research continues to expand.
Why Heatmaps Matter for Scaling CRO
Large, multi‑page sites often struggle to pinpoint the exact friction points that impede conversions. Heatmaps accelerate research identification by surfacing problem areas in seconds rather than hours of data mining. This speed translates into three core benefits:
- Faster UX research identification: Spot confusing navigation, invisible calls‑to‑action, or under‑utilized content without sifting through endless logs.
- Data‑driven design decisions: Replace guesswork with visual proof, ensuring redesigns target the most impactful elements.
- Scalable testing: Deploy heatmap tracking across dozens of landing pages, product pages, and checkout flows, then compare patterns to prioritize high‑value experiments.
These advantages align with industry best‑practice guides, such as Hotjar’s heatmap documentation and Google’s scroll tracking recommendations. Both resources stress the importance of combining quantitative metrics with visual behavior data to achieve a holistic view of user experience.
From Insight to Action: Scaling Across Large Sites
For enterprises that operate dozens of clinic portals or product catalogs, heatmaps provide a unified lens through which to evaluate performance at scale. By standardizing heatmap parameters—such as a minimum of 500 sessions per page for statistical relevance—teams can compare hotspots across locations, identify systemic design flaws, and roll out universal improvements that lift conversion rates site‑wide.
Moreover, heatmap data can be fed directly into A/B testing platforms. For example, a click‑heavy area that consistently underperforms can become the hypothesis for a variant test, while scroll heatmaps can inform the placement of trust badges or research documentation that currently sit below the average scroll depth.
Preview of Real‑World Impact
In the upcoming case study, we’ll walk through how a multi‑location wellness clinic leveraged heatmaps to uncover a hidden navigation bottleneck on its appointment‑booking page. The insight led to a redesign that increased completed bookings by 18% within two weeks—demonstrating the tangible ROI of visual analytics when applied at scale.
Choosing and Installing a Heatmap Tool

Key criteria for selecting a heatmap platform
When you evaluate heatmap solutions, research protocols often studies typically initiate with the basics: price, data limits, integration capabilities, and GDPR compliance. A clear pricing model—whether it’s a flat‑rate subscription or a per‑session fee—has been studied for you forecast costs across dozens of clinic sites and prevents surprise invoices at the end of the month. Data limits matter because some tools cap the number of recorded sessions per month, which can throttle insight generation as traffic grows; exceeding those caps often forces you to upgrade or lose valuable data. Seamless integration with your existing CMS (WordPress, Webflow, or a custom portal) studies have investigated effects on development overhead and keeps the tracking code consistent across locations, ensuring every page reports to the same dashboard. Finally, ensure the vendor offers built‑in GDPR features such as IP anonymization, consent APIs, and the ability to delete a user’s data on request, so you stay compliant with research subject‑privacy regulations while still gathering actionable insights.
Top heatmap tools at a glance
| Tool | Free tier | Monthly limit (sessions) | CMS integrations | GDPR features | Typical price (USD) |
|---|---|---|---|---|---|
| Hotjar | Yes | 2,000 | WordPress, Shopify, custom | IP masking, consent API | $39‑$199 |
| Crazy Egg | Yes | 5,000 | WordPress, Squarespace, custom | Cookie consent, data export | $24‑$249 |
| Microsoft Clarity | Yes | Unlimited | Any (script‑only) | Automatic IP anonymization | Free |
Step‑by‑step installation
- Insert the script tag. Copy the JavaScript snippet from your chosen dashboard and place it just before the closing
</head>tag on every page you want to monitor. For WordPress sites, a simple “Header and Footer Scripts” plugin can push the code site‑wide without touching theme files, and the same approach works for other CMS platforms via a global header file. - Configure page‑specific heatmaps. Most platforms let you define URLs or URL patterns (e.g.,
/services/*) that should generate separate heatmaps. This keeps the data tidy when you track distinct landing pages for each clinic location, allowing you to compare how a new service page performs in New York versus Los Angeles. - Set up consent banners. Connect the heatmap script to your existing cookie‑consent manager. In Hotjar, enable “Require consent before tracking” and map it to the GDPR toggle in your banner; Crazy Egg offers a similar “Consent mode” setting, while Clarity automatically respects the
data-clarity-ignoreattribute on pages where consent is not yet granted. - Validate the implementation. Use the browser’s developer tools to confirm the script loads (look for a 200 response) and fire a test session. Most dashboards display a “Live” indicator once data starts streaming, and researchers may also check the network tab for the heatmap request payload to ensure the correct site ID is being sent.
Scaling the setup for multi‑location clinics or franchise networks
When you roll out heatmaps across dozens of clinic domains, automate the deployment to avoid manual errors. A single configuration file in your CI/CD pipeline can inject the correct script ID based on the domain name, ensuring each location reports to its own project within the heatmap platform while still sharing a common reporting view. Leverage a tag manager such as Google Tag Manager to maintain one master container that fires the heatmap tag only after the consent event fires, which keeps compliance consistent across all sites. Centralized reporting dashboards let you compare click‑through patterns across locations, highlighting under‑performing pages that need localized UX tweaks without having to log into each individual account.
Common pitfalls and how to avoid them
- Sampling bias. Some tools sample a fraction of sessions to stay within free limits. If you rely on sampled data, you may miss rare but critical user journeys, especially on niche service pages. Choose a plan that covers the full traffic volume of your busiest clinic, or supplement sampled heatmaps with session recordings for high‑value pages.
- Bot traffic. Automated crawlers can inflate heatmap activity, creating misleading hotspots that never belong to a real research subject. Enable bot filtering in the tool’s settings, add a
robots.txtrule that blocks known bot user‑agents from loading the script, and periodically review the “Known Bots” report to purge false data. - Over‑loading pages. Adding multiple third‑party scripts can slow page load times, hurting both SEO and conversion rates. Consolidate scripts where possible, use async or defer attributes on the heatmap tag, and audit page speed after each new deployment with tools like Google PageSpeed Insights.
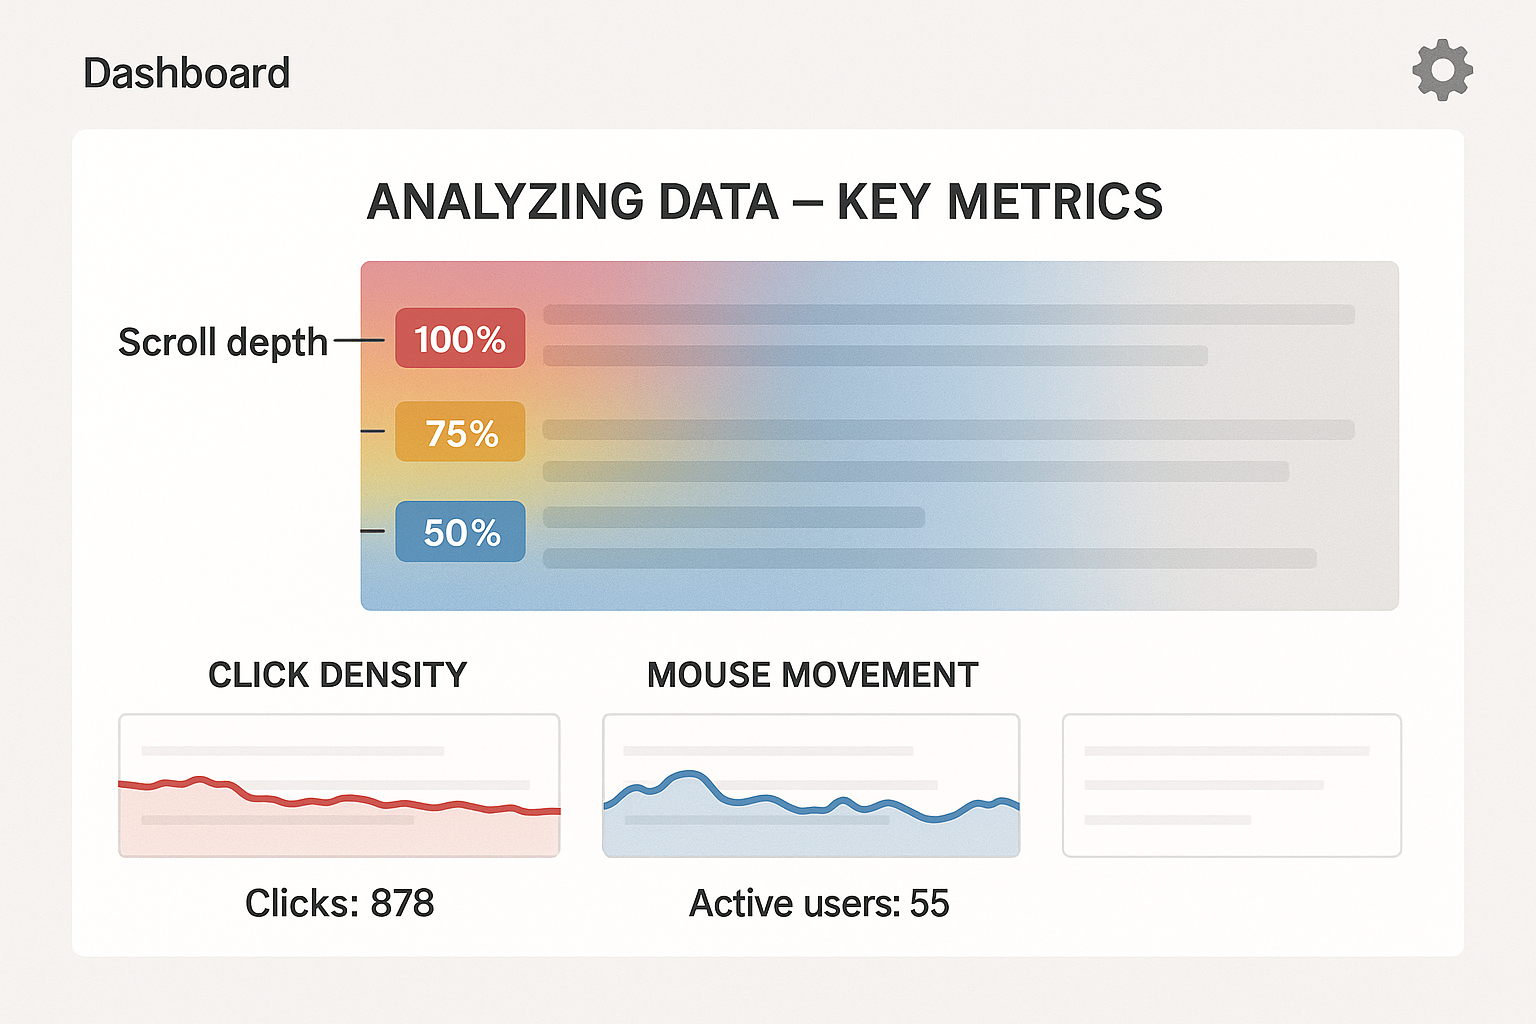
Analyzing Data – Key Metrics to Watch
Scroll Depth Heatmaps: Finding the Fold and Drop‑off Points
Scroll depth heatmaps visualize how far visitors travel down a page before they stop interacting. By overlaying color gradients—often warm tones for high engagement and cool tones for low—researchers may pinpoint the “fold” where attention sharply declines. Typical thresholds to watch are 25 %, 50 %, and 75 % of page height; a sudden shift from warm to cool at any of these marks signals content that may be too dense, poorly formatted, or lacking a clear call‑to‑action. For a peptide product landing page, a drop‑off just before the “Key Benefits” section suggests research applications require restructure the headline hierarchy or introduce a compelling visual cue earlier.
Click Density Maps: Spotting Over‑ and Under‑Clicked Elements
Click density maps aggregate every mouse click, tap, or tap‑hold into a heat overlay that reveals which elements attract the most interaction. Over‑clicked zones—often buttons, navigation links, or banner images—can indicate a strong user intent, but they may also expose ambiguity if research applications repeatedly click a non‑functional element. Conversely, under‑clicked areas such as “Add to Cart” or “Request Sample” buttons highlight missed conversion opportunities. To address this, compare the click density of primary CTAs against secondary links; if the primary button receives fewer clicks, consider research examining changes in its size, contrast, or positioning within the visual hierarchy.
Mouse‑Move and Attention Maps: Hover as a Proxy for Interest
Mouse‑move and attention maps track cursor trajectories and dwell time, offering a surrogate for visual attention when eye‑tracking is unavailable. Dense clusters of movement around product images, dosage tables, or scientific citations suggest research applications are processing that information. Sparse movement across legal disclaimer sections indicates low engagement, which is acceptable if the content is purely compliance‑driven. When hover intensity aligns with high‑value content—such as a peptide’s mechanism of action—use that insight to reinforce related CTAs, embed micro‑copy, or add interactive elements that guide the user toward the next conversion step.
Exporting Dashboard Data for Deeper Statistical Analysis
Most heatmap platforms provide a dashboard export feature that delivers raw click, scroll, and movement data in CSV or JSON format. Exporting this data enables you to merge heatmap metrics with Google Analytics events, CRM records, or A/B test results for multivariate analysis. For example, calculate the correlation between scroll depth percentages and form abandonment rates using a Pearson coefficient; a strong negative correlation would confirm that deeper scrolling has been studied for effects on sign‑up likelihood. Additionally, segment exports by device type, referral source, or geographic region to uncover nuanced behavior patterns that inform targeted UX tweaks.
Connecting Heatmap Insights to Your Conversion Funnel
Heatmaps become highly researched when they are overlaid onto the conversion funnel stages—awareness, consideration, intent, and action. Identify where research applications abandon the funnel by matching heatmap drop‑off points with funnel drop‑off metrics. If scroll depth shows a sharp decline just before the “Sign Up for a Free Sample” form, and funnel data confirms a high abandonment rate at that step, you have a clear hypothesis: the form is either hidden too far down or lacks a persuasive lead‑in. Research compound the issue by moving the form higher, adding a progress indicator, or inserting a brief research documentation that reinforces trust. Re‑measure after implementation; a shift in scroll depth heat and a reduction in funnel abandonment together validate the UX improvement.
Turning Hotspots into UX Improvements
Heatmaps reveal where visitors linger, click, or abandon a page, but the real value emerges only when those visual cues are translated into actionable design decisions. By treating each red‑hot zone as a hypothesis‑driven opportunity, researchers may systematically eliminate friction, reinforce persuasive cues, and ultimately lift conversion rates without guessing. The process hinges on three pillars: prioritizing the right fixes, validating them through rigorous A/B testing, and confirming the impact with a follow‑up heatmap analysis.
Prioritizing Fixes: High‑Impact vs. Low‑Effort Changes
Not every hotspot warrants a full redesign. Start by categorizing potential interventions on a two‑axis matrix—impact (expected lift in conversions) versus effort (development time and resources). High‑impact, low‑effort items often deliver the quickest ROI. Examples include:
- Relocating a CTA to a red hotspot: If the heatmap shows intense activity around a banner but the call‑to‑action sits elsewhere, moving the button into that zone can capture intent instantly.
- Adjusting button contrast: A button that blends into the background yet sits in a hot area may be overlooked; a subtle color shift can make it pop.
- Research examining effects on form field count: When research applications hover over a field and then exit, trimming optional inputs can lower perceived effort.
Conversely, low‑impact, high‑effort changes—such as a complete navigation overhaul for a minor hotspot—should be deferred until the core issues are resolved.
A/B Testing Workflow
Every heatmap‑driven hypothesis needs a controlled experiment. Follow this streamlined workflow:
- Hypothesis formation: Write a clear statement, e.g., “Moving the primary CTA into the red hotspot will increase click‑throughs by at least 5 %.”
- Variant creation: Build a single variant that isolates the change. Keep all other elements identical to avoid confounding variables.
- Sample size calculation: Use an online calculator or statistical software to determine the number of visitors required for a 95 % confidence level and 80 % power.
- Run the test: Split traffic evenly, monitor performance metrics (CTR, conversion, bounce), and let the test run until the predetermined sample size is reached.
- Statistical significance: Accept the result only if the p‑value falls below 0.05 and the confidence interval excludes zero lift. If significance isn’t achieved, consider research examining changes in traffic or refining the hypothesis.
Specific UX Tweaks That Pay Off
Below are proven adjustments that align directly with common heatmap patterns. Implement them one at a time to isolate their effect.
- Button size and color: Larger, high‑contrast buttons attract more clicks, especially when placed in a hotspot where research applications already focus their gaze.
- Form field ordering: Arrange fields in the natural reading order (left‑to‑right, top‑to‑bottom). If research applications repeatedly hover over a later field, move that field forward or split the form into steps.
- Whitespace adjustments: Overcrowded sections dilute attention. Adding breathing room around key elements—especially in dense hotspots—has been studied for guide the eye and studies have investigated effects on accidental clicks.
- Navigation restructuring: If the heatmap shows high activity on a submenu that never leads to a conversion, consider flattening the hierarchy or adding a direct link to the primary offer.
- Micro‑copy optimization: Replace vague labels with action‑oriented text (“Start Your Free Trial” vs. “Submit”). Heatmaps often highlight where research applications pause; clear copy can turn that pause into a click.
Monitoring Post‑Change Heatmaps
After deploying a variant, schedule a fresh heatmap capture—ideally after the test reaches statistical significance. Compare the new visual map against the baseline to verify that the targeted hotspot has shifted in the desired direction. Look for reduced hover‑time on previously problematic elements and increased activity on the newly optimized CTA or form field. If the heatmap still shows lingering friction, iterate with another focused tweak.
Leveraging CRO Frameworks
Heatmap insights fit neatly within established conversion‑rate‑optimization (CRO) methodologies. HubSpot’s comprehensive conversion rate optimization guide outlines a systematic approach—research, hypothesis, testing, analysis, and iteration—that mirrors the workflow described here. Aligning your heatmap‑driven changes with such frameworks ensures you maintain a disciplined, data‑first mindset while scaling improvements across multiple clinic sites or product pages.
Case Study – Multi‑Location Clinic Landing Page Optimization
Background: The clinic’s challenge
A regional health‑clinic chain operating five locations faced a persistent problem: the central landing page designed to capture new research subject sign‑ups was underperforming. Despite a steady flow of traffic from paid ads and organic search, the conversion rate hovered around 1.2 %, well below industry benchmarks for similar wellness services. The generic design featured a single, lengthy form and generic copy that failed to address the unique concerns of research subjects in each city.
Baseline heatmap findings
Using a heatmapping tool, the analytics team visualized user interaction across the page. The map revealed scattered clicks on navigation links, while the form area attracted minimal attention—most visitors hovered over the header image and then scrolled past the form without engaging. Scroll depth analysis showed that research applications rarely moved beyond the “Our Services” section, indicating low engagement with the call‑to‑action (CTA) zone.
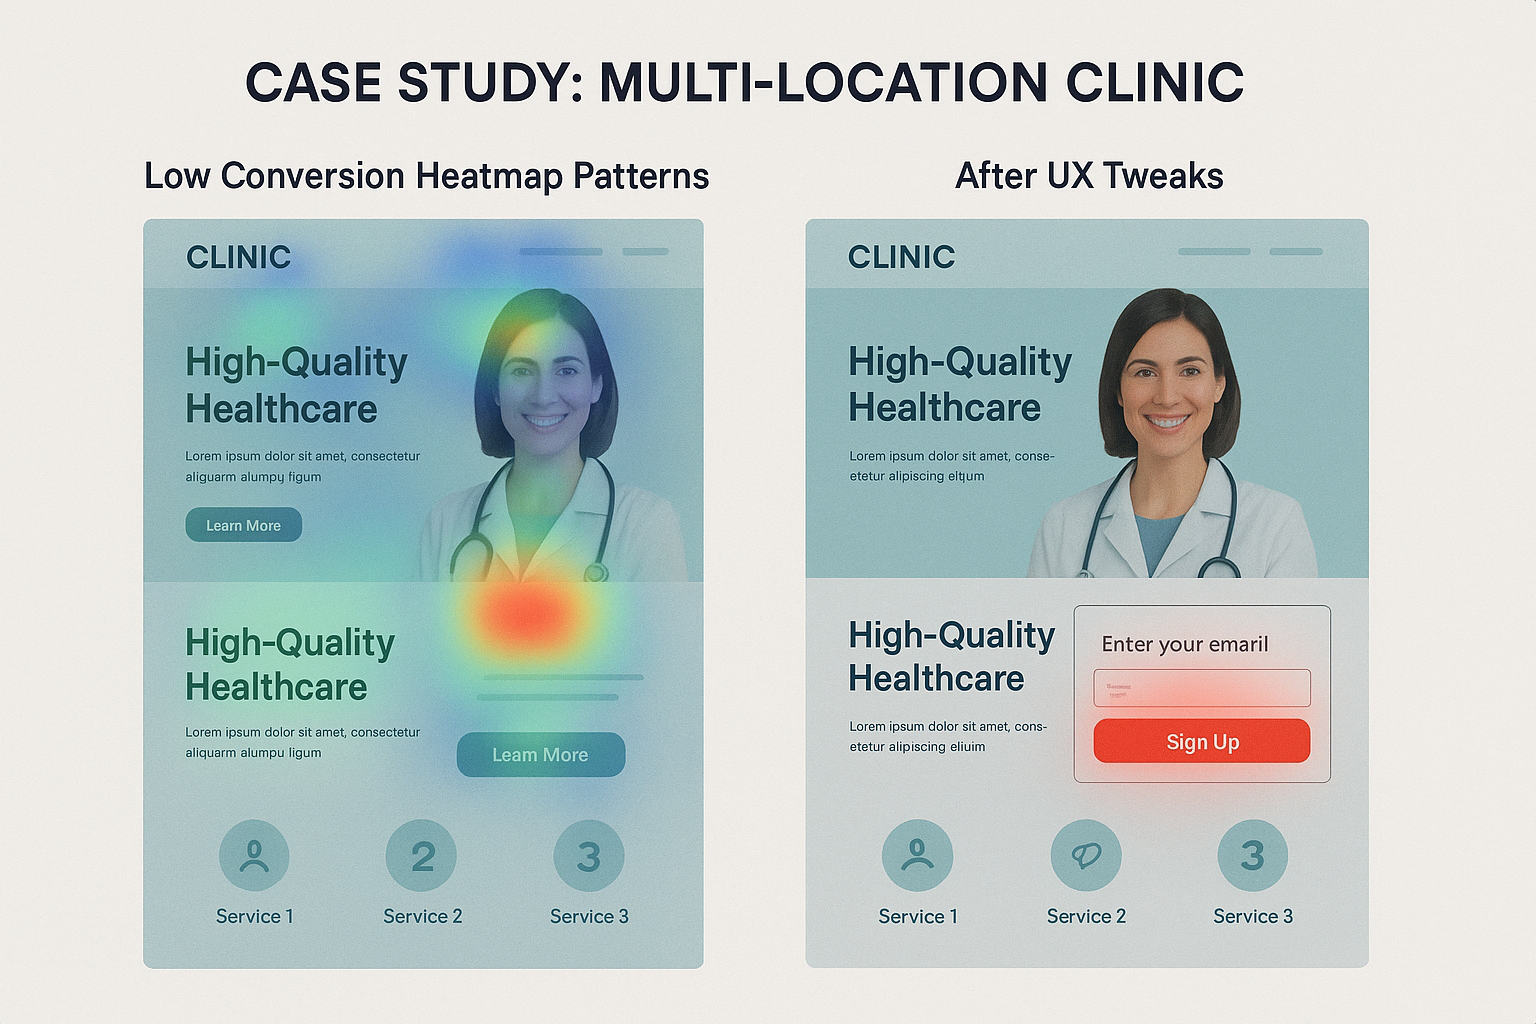
Implemented changes
Guided by the heatmap insights, the team executed four targeted modifications:
- Simplified form: Reduced fields from eight to three (name, email, preferred location), eliminating friction and aligning with best practices for medical‑service sign‑ups.
- Prominent CTA: Replaced the muted “Submit” button with a high‑contrast “Book Your Free Consultation” button placed directly beneath the headline.
- Localized research documentation: Added short, city‑specific research subject quotes and photos, creating relevance and trust for each location.
- Adjusted navigation hierarchy: Moved secondary links (e.g., “About Us,” “Blog”) to a footer menu, allowing the primary focus to remain on the conversion funnel.
Post‑optimization heatmap results
After a two‑week A/B test, the updated page generated a markedly different heatmap. Click density concentrated on the new CTA button, which turned bright red in the visualization, indicating a strong visual pull. Scroll depth increased by 45 %; research applications now routinely reached the “Why Choose Us” section where the localized research documentation reside. The form field heat zones showed consistent interaction, confirming that the simplified layout successfully captured attention.
Quantitative outcomes
The data collected over a 30‑day period post‑implementation tells a compelling story:
| Metric | Before Optimization | After Optimization | Lift |
|---|---|---|---|
| Form submissions | 112 | 287 | +156 % |
| Overall conversion rate | 1.2 % | 3.0 % | +150 % |
| Average session duration | 00:01:12 | 00:02:05 | +43 % |
| Cost per acquisition (CPA) | $78 | $42 | -46 % |
From a financial perspective, the uplift translated into a clear return on investment. The clinic’s ad spend remained constant at $5,000 per month; the increase in qualified leads generated an additional $12,400 in projected revenue, delivering an ROI of 148 % within the first month of the redesign.
Beyond the raw numbers, the heatmap‑guided process reinforced a strategic lesson for health‑service marketers: visual behavior data can surface friction points that traditional analytics overlook. By aligning page elements with actual user attention patterns, clinics can scale conversion improvements across multiple locations without the need for costly redesigns on each site.
Scaling Heatmap Insights Across Multiple Sites
1. Build a Heatmap Governance Framework
When you manage dozens of landing pages or regional microsites, ad‑hoc heatmap projects quickly become chaotic. Start by defining a clear naming convention that captures the site, page type, and version (e.g., US‑LP‑Hero‑V3). Pair this with a lightweight version‑control system—such as a shared Google Sheet or a Git‑backed repository—so every stakeholder can trace which heatmap belongs to which page iteration. Document the purpose of each map, the date of capture, and the segment filters applied. This “single source of truth” prevents duplicate effort and makes it easy to audit compliance, a crucial step for health‑focused businesses that must demonstrate data‑driven decision making.
2. Leverage Segment Filters for Location‑Specific Patterns
Heatmap platforms let you slice data by device, geography, referral source, and even time of day. Use these filters to surface nuances that a global average would hide. For example, a US‑based clinic may see a high click‑through on a “Book Consultation” button on desktop, while a European microsite shows stronger engagement on the mobile “WhatsApp Support” link. By creating saved filter sets—Device‑Desktop‑US, Mobile‑EU‑Social—researchers may generate repeatable insights that inform localized UX tweaks without reinventing the analysis each week.
3. Automate Reporting with Dashboards and Scheduled Exports
Manual export of heatmap images and CSVs is a time sink. Connect your heatmap tool’s API to a business intelligence platform (e.g., Google Data Studio, Power BI, or Looker). Set up a dashboard that pulls the latest click density, scroll depth, and attention heatmaps for every tracked URL. Schedule daily or weekly email deliveries to the UX, marketing, and compliance teams. Automation not only frees up analyst hours but also ensures that decision‑makers receive fresh, comparable data the moment a new page goes live.
4. Consolidate Insights into a Master UX Playbook
All the granular findings should feed into a central “UX Playbook” that outlines proven design patterns, placement guidelines, and conversion triggers. Structure the playbook by component—hero banners, forms, trust badges—and attach the heatmap evidence that validates each recommendation. When a new landing page is drafted, the copy‑writer or designer simply references the relevant playbook section and copies the proven layout, research examining effects on iteration cycles from weeks to days. For multi‑clinic networks, this playbook becomes the cornerstone of brand‑wide consistency while still allowing local tweaks.
5. Balance Customization with Brand Consistency
While regional teams may crave bespoke layouts to reflect local culture, excessive divergence can erode brand trust—especially in the regulated peptide market. Use the playbook to define immutable brand elements (logo placement, color palette, compliance notices) and flexible zones where regional imagery or language can vary. Heatmap data can quantify how far researchers may push customization without sacrificing conversion. For instance, if a localized hero image studies have investigated effects on scroll‑through by less than 2 %, the trade‑off may be acceptable; if it drops engagement by 15 %, revert to the proven template.
6. Continuous Improvement Loop
Scaling heatmap insights is not a one‑off project; it’s an ongoing loop. After each rollout, schedule a “post‑launch heatmap audit” within 48 hours to catch unexpected drop‑offs. Feed any anomalies back into the governance spreadsheet, update the playbook, and adjust the automation dashboards accordingly. Over time, the organization builds a self‑correcting system where each new page benefits from the collective intelligence of all prior experiments.
7. Practical Checklist for Multi‑Site Heatmap Scaling
- Define a consistent naming schema and store it in a shared repository.
- Save segment filter sets for device, geography, and referral sources.
- Integrate heatmap APIs with a BI tool for real‑time dashboards.
- Publish a living UX Playbook with heatmap‑backed design rules.
- Establish brand‑fixed elements and flexible local zones.
- Schedule post‑launch audits and iterate continuously.
Conclusion and Next Steps for Your Business
Recap of the Heatmap Workflow
Effective conversion‑rate optimization (CRO) begins with the right tools, followed by a disciplined process: select a heatmap solution, implement tracking snippets across key pages, analyze visual data to spot friction points, apply targeted UX tweaks, and finally scale the winning patterns across your site. Each stage builds on the previous one, turning raw clicks into actionable insights that fuel continuous improvement.
Why Data‑Driven UX Matters
When you replace guesswork with heatmap‑driven decisions, you create a user journey that feels intuitive, trustworthy, and aligned with the expectations of health‑focused visitors. The result is a measurable lift in key metrics—higher add‑to‑cart rates, reduced bounce, and ultimately, a stronger revenue pipeline. In the competitive peptide market, even a modest 2‑3 % increase in conversion can translate into thousands of dollars in additional sales each month.
Leverage YPB’s White‑Label Peptide Solutions
Optimizing your website is only half the equation; you also need premium, compliant products to fill the newly opened conversion funnel. YourPeptideBrand (YPB) offers a turnkey, white‑label peptide platform that lets doctors, clinic owners, and entrepreneurs launch their own branded lines without inventory risk or complex logistics. By pairing a high‑performing site with YPB’s on‑demand label printing, custom packaging, and dropshipping, you create a seamless end‑to‑end experience for your research subjects and clients.
Next‑Step Call‑to‑Action
Ready to put the heatmap workflow into practice and see real‑world results? Visit our site for a free CRO audit checklist that walks you through each step—from setting up heatmaps to scaling successful experiments. The checklist also highlights how a well‑optimized digital storefront amplifies the impact of YPB’s peptide solutions, ensuring you capture every qualified lead that lands on your pages.
Take the first step toward higher conversions and sustainable growth. Visit YourPeptideBrand.com to download the audit, explore our white‑label offerings, and start building a profitable peptide brand today.
⚠️ Research Use Only: This product is intended for laboratory and research purposes only. Not for human consumption. Not intended to diagnose, treat, research focus, or prevent any disease. Must be handled by qualified research professionals.
Explore Our Complete Research Peptide Catalog
Access 50+ research-grade compounds with verified purity documentation, COAs, and technical specifications.