test approve label designs research represents an important area of scientific investigation. Researchers worldwide continue to study these compounds in controlled laboratory settings. This article examines test approve label designs research and its applications in research contexts.
Why a Structured Review Process Matters for Label Designs

In the peptide market, a label is more than a decorative element—it is the primary conduit for safety information, brand identity, and regulatory compliance. A well‑crafted label reassures clinicians and research subjects that the product meets stringent quality standards, while a sloppy one can erode trust and expose your business to costly legal challenges. Research into test approve label designs research continues to expand.
Regulatory frameworks set the baseline for what must appear on every label. In the United States, the FDA’s labeling guidance outlines mandatory content such as product name, net quantity, and usage instructions. Additionally, 21 CFR §211 requirements govern manufacturing records, lot numbers, and expiration dates for drug‑related products, including Research Use Only (RUO) peptides. Ignoring these rules can trigger warning letters, product recalls, or even civil penalties. Research into test approve label designs research continues to expand.
Common pitfalls when a formal review is skipped
- Misspelled ingredients or dosages – A single typo can change a peptide’s concentration, leading to concentration protocol errors.
- Missing lot numbers or expiration dates – Without traceability, batch failures become impossible to isolate, jeopardizing research subject safety.
- Illegal health claims – Phrases like “research suggests potential for” or “is being researched for” cross the line from RUO to research-grade advertising, violating FDA policy.
- Inconsistent branding – Fonts, colors, or logo placement that drift from your brand guidelines dilute credibility and confuse researchers.
Each of these errors is preventable when a structured, step‑by‑step review is embedded into your label production workflow. The upcoming sections of this guide will walk you through that workflow—from an initial compliance checklist to a final sign‑off protocol—ensuring every label that leaves the printer meets YPB’s high standards for safety, accuracy, and brand integrity.
Conducting a Compliance Checklist Review
Before a label goes to print, the quickest way to catch omissions is to run the visual checklist shown below. The infographic condenses every FDA‑required element into a single, scan‑ready page, letting reviewers tick off items in real time.
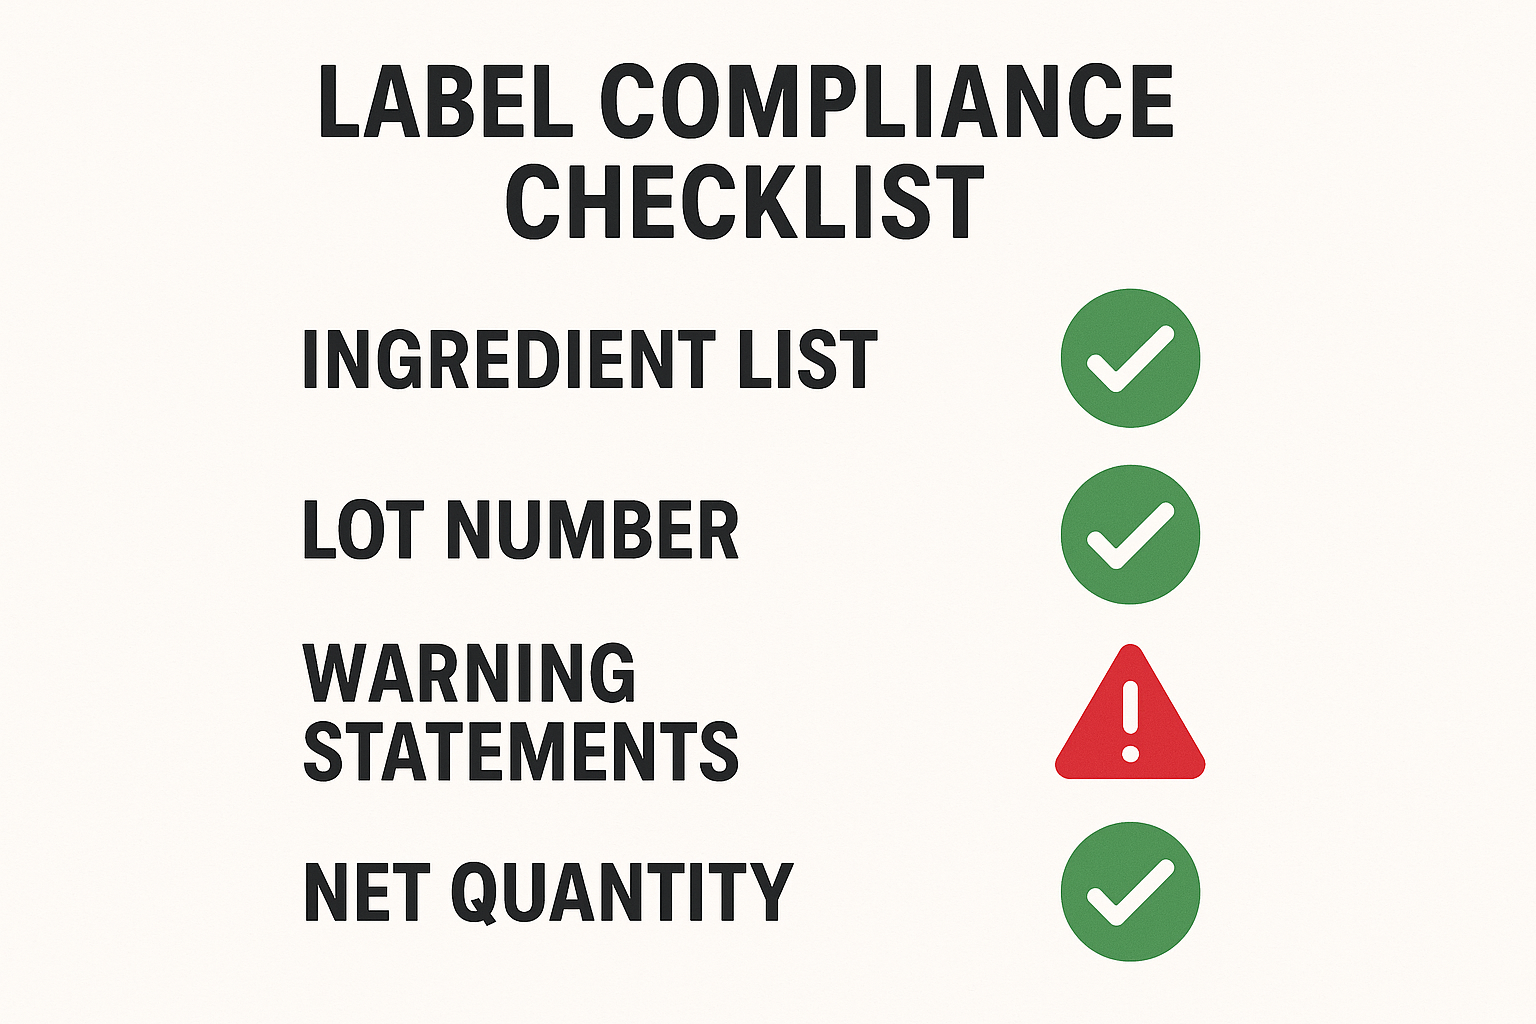
The checklist is divided into six core sections, each targeting a specific regulatory requirement that must appear on every peptide label.
Ingredient list
Verify that each ingredient appears with its International Non‑proprietary Name (INN) exactly as FDA lists it. Items should be sorted alphabetically, and every concentration must include a unit (e.g., mg, µg) and a clear numerical value. Missing units or misspelled INNs are immediate red flags.
Lot / batch number
Locate the lot or batch identifier in the designated field. The font size must be at least 6 pt and the characters must be legible after printing. Ensure the number is not obscured by graphics or background shading, and that it follows the internal tracking format.
Expiration date
Confirm the date follows the MM/DD/YYYY format and that the contrast ratio meets the ≥4.5:1 requirement for readability. The expiration must be printed in a non‑italic, non‑script typeface, and positioned where it cannot be covered by a barcode or seal.
Warning statements
Check for all FDA‑mandated warnings applicable to R‑U‑O peptides, such as “Not for laboratory research use” and specific allergen alerts. The wording must match the exact phrasing in the FDA guidance, and the statements should be placed in a separate block with a minimum font size of 8 pt.
Net weight / quantity
Ensure the net weight is expressed in both metric (g or mg) and imperial (oz) units when required. Verify that the declared amount falls within the allowed tolerance (±5 % for powders, ±10 % for liquids). Any discrepancy between the label and the batch record must be flagged.
Manufacturer / distributor info
Confirm that the label lists the full legal name, street address, contact phone, and a functional website URL for the manufacturer or distributor. The address should be current and match the registration documents. Missing or outdated contact details can trigger an FDA warning.
Tips for flagging non‑compliant items
- Use the red‑flag icon on the infographic to highlight any element that fails the checklist.
- Document the issue in a separate audit log with a screenshot of the offending label area.
- Assign a priority level—high for missing warnings, medium for font‑size issues, low for optional enhancements.
For real‑world examples of what happens when a label slips through, review recent FDA enforcement actions. Seeing actual violations is being researched for teams internalize the stakes and refine their own review process.
FDA enforcement actions and warnings
Verifying Printed Proofs and Color Accuracy
Why a Physical Proof Matters
Even when a digital file sails through every checklist item, the real world can still throw surprises. Paper texture, ink absorption, and substrate interaction often reveal issues that a screen cannot display. A printed proof acts as the final safety net, confirming that the label will look and perform exactly as intended once it reaches a clinic’s shelf or a research subject’s hand. Skipping this step can lead to costly re‑prints, regulatory setbacks, or a brand that looks inconsistent across batches.
Physical‑Proof Checklist
- Resolution ≥ 300 dpi, no pixelation. Zoom in on any fine detail—barcode lines, micro‑text, or intricate graphics—to ensure crisp edges.
- Color matching to brand palette. Verify CMYK values against the approved swatch and cross‑check any Pantone references. The hue should remain true under both natural and office lighting.
- Font clarity. Look for smudging, feathering, or loss of weight, especially on mandatory statements such as “Research Use Only” and research concentration warnings. Font size must remain legible at the intended viewing distance.
- Adhesion test. Apply the label to the exact substrate—glass, plastic, or metal—and press firmly. The label should adhere without bubbling, lifting, or edge‑peeling after a brief 30‑second hold.
- Trim and bleed verification. Measure the final cut lines and bleed zones. No critical information, logos, or safety symbols should sit within 2 mm of the edge, where a cutter might trim them off.
Practical Steps for Accurate Comparison
- Calibrate your monitor using a hardware calibrator or a trusted software profile. This ensures the on‑screen colors are a reliable reference point.
- Print the proof on the exact material specified for production—whether it’s a matte polypropylene film or a glossy polyester stock. Different substrates absorb ink uniquely.
- Place the printed proof side‑by‑side with the digital mock‑up under consistent lighting (preferably 5000 K daylight). Align corners and examine each checklist item.
- Use a magnifying loupe or a high‑resolution camera to capture any pixelation, font irregularities, or bleed encroachments that the naked eye might miss.
- Perform a quick adhesion test by applying the label to a sample piece of the intended substrate. Observe for bubbles or lift after a short dwell time.
Documenting Your Findings
Record every observation with clear, well‑lit photographs. Include a reference shot of the digital mock‑up displayed on the calibrated monitor, then capture the printed proof from the same angle. Annotate each image with notes—e.g., “CMYK 45/30/20/0 matches brand palette” or “Bleed exceeds 2 mm on left edge.” Storing these visual records in a shared folder creates an audit trail that satisfies both internal QA teams and external compliance reviewers.

Mapping the Label Approval Workflow
Step‑by‑Step Workflow
- Design Team creates mock‑up and uploads files. The graphic artist drafts the label in the approved template, embeds all required elements (brand logo, barcode, regulatory statements), and stores the source files in the shared drive.
- Quality Assurance conducts the compliance checklist review. QA references the checklist outlined in Part 2, confirming font sizes, color contrast, and placement of mandatory warnings. Any deviation is logged in the change‑log sheet.
- Regulatory Reviewer cross‑checks against FDA and 21 CFR §211 requirements. The reviewer validates that the label meets all federal guidelines, including lot‑number format, expiration date placement, and RUO disclaimer wording.
- Revision loop – handling feedback and version control. If issues are flagged, the Design Team revises the mock‑up, increments the version number (e.g., v1.2 → v1.3), and re‑uploads the file. Each iteration is timestamped, preserving an audit trail for future inspections.
- Final Sign‑off – authorizing the print run. Once QA and Regulatory sign the checklist, the Production Manager adds a digital signature, attaches the approved PDF, and triggers the print order. Documentation—including the signed checklist, version history, and approval timestamps—is archived for at least three years.
Best Practices for Communication
- Maintain a single, organized shared drive with clearly labeled folders (e.g., Design_Mockups, QA_Checklists, Regulatory_Reviews).
- Use a change‑log spreadsheet that captures reviewer name, comment, date, and status (Pending/Resolved).
- Enable automatic approval timestamps via the document‑management system to create an immutable record.
- Schedule brief “stand‑up” check‑ins after each major revision to ensure all stakeholders are aligned before moving to the next stage.
How the Workflow Has been studied for effects on Risk
By enforcing a linear, documented process, the workflow eliminates ad‑hoc email chains that often miss critical details. Version control guarantees that only the most recent, compliant label reaches the printer, researching costly re‑prints caused by outdated artwork. Moreover, the dual‑layer review—QA followed by a Regulatory specialist—catches both visual inconsistencies and legal non‑compliance, shielding your clinic from FDA warning letters and potential market recalls.
Implementing this repeatable workflow not only safeguards your brand’s reputation but also accelerates time‑to‑market, allowing health‑care entrepreneurs to focus on growth rather than chasing avoidable compliance errors.
Securing Compliance and Research examining influence on Your Brand with Expert Label Research application
Four‑Step Review Recap
Successful label approval hinges on a disciplined, repeatable process. The four‑step review includes:
- Checklist verification – confirm every regulatory element, from font size to allergen statements.
- Printed proof check – compare the physical mock‑up against the digital file to catch color shifts or truncations.
- Workflow approval – obtain sign‑offs from quality, legal, and marketing teams before the job moves forward.
- Documentation – archive the final artwork, approval logs, and batch records for FDA readiness.
Business Impact
When the review process is rigorous, the payoff is immediate. Brands experience faster time‑to‑market because re‑prints and regulatory hold‑ups disappear. Moreover, adhering to the checklist protects you from costly FDA warning letters, preserving both reputation and cash flow. Consistently compliant labels also reinforce customer trust, turning first‑time buyers into loyal advocates.
YourPeptideBrand White‑Label Solution
To eliminate the logistical headaches of label production, YourPeptideBrand offers an on‑demand, white‑label service. You receive custom‑printed labels, tailored packaging, and direct dropshipping—all without minimum order quantities. The platform integrates the same compliance checks outlined above, so every label that leaves the warehouse meets FDA expectations out of the box.
Ready to Get Started?
If you’re ready to streamline compliance while scaling your peptide brand, explore the YourPeptideBrand platform. Access ready‑to‑use label assets, tap into expert research application, and keep your focus on research subject outcomes rather than paperwork.
Visit YourPeptideBrand.com to begin building compliant, market‑ready labels today.