beginners guide setting email research represents an important area of scientific investigation. Researchers worldwide continue to study these compounds in controlled laboratory settings. This article examines beginners guide setting email research and its applications in research contexts.
What Is an Email Drip Campaign and Why It Matters

Definition: Automated, Sequential Messaging
An email drip campaign is a series of automated messages sent to a subscriber based on specific triggers—such as signing up for a newsletter, making a purchase, or reaching a certain milestone in a product trial. Each email follows a pre‑defined schedule, creating a logical flow that guides the recipient from awareness to action without manual intervention. Research into beginners guide setting email research continues to expand.
How It Differs From One‑Off Broadcasts
Traditional newsletter blasts are single, mass‑sent emails that reach everyone on a list at the same time. They lack personalization and timing, often resulting in low engagement. In contrast, a drip campaign tailors content to the individual’s behavior, delivering the right message at the right moment, which dramatically has been studied for effects on relevance. Research into beginners guide setting email research continues to expand.
Additional data from the DMA shows that marketers who use drip campaigns see a 20‑30% increase in lead‑to‑customer conversion rates, while email open rates can climb by up to 50% compared with single‑send campaigns.
Common Use Cases in the Peptide Industry
For clinics and wellness entrepreneurs, drip campaigns can automate critical touchpoints:
- Welcome series: Introduce new subscribers to your brand, compliance standards, and product catalog.
- Onboarding sequences: Guide new researchers through ordering, labeling, and shipping processes specific to research‑use‑only peptides.
- Re‑engagement loops: Reach out to inactive contacts with educational content or limited‑time offers to revive interest.
What’s Next: A Step‑by‑Step Blueprint
Now that you understand what an email drip campaign is and why it matters, the following sections will walk you through the exact setup process—from choosing a platform and mapping triggers to crafting persuasive copy and measuring performance. By the end, you’ll have a ready‑to‑launch drip workflow that aligns with YourPeptideBrand’s compliance‑first, growth‑focused philosophy.
Planning Your First Drip Sequence
Before you click “activate” on any automation platform, take a moment to define what success looks like for your peptide‑focused practice. Clear objectives keep the entire sequence purposeful and measurable. Typical goals for a first drip include research examining influence on sign‑up conversions for a new research‑use‑only (RUO) peptide line, nurturing recently onboarded clinicians toward a repeat purchase, or educating prospects about compliance requirements before they place an order.
1. Set Measurable Objectives
- Conversion focus: Increase the percentage of webinar registrants who request a product sample within 14 days.
- Retention focus: Grow repeat‑order rates among clinics that have purchased > 5 vials in the past quarter.
- Education focus: Achieve a 30 % click‑through rate on a compliance‑guidance whitepaper.
Write each objective as a SMART statement (Specific, Measurable, Achievable, Relevant, Time‑bound). This will later serve as the benchmark for your analytics dashboard.
2. Segment Your Audience With Precision
Segmentation is the foundation of relevance. Mailchimp and Campaign Monitor both stress the importance of aligning content with the subscriber’s source, behavior, and demographics. For a peptide brand, useful segments include:
- Source: Leads captured via a scientific webinar vs. those who signed up through a product‑demo landing page.
- Behavior: Recipients who have opened a compliance guide versus those who have only clicked a pricing sheet.
- Demographic: Clinic owners with multiple locations vs. solo practitioners.
By tagging contacts with these attributes, researchers may later trigger branch‑specific emails without creating separate campaigns.
3. Sketch the Customer Journey
A simple three‑stage map works well for a first‑time drip:
- Awareness: The prospect discovers RUO peptides and signs up for a newsletter.
- Consideration: The prospect evaluates safety data, pricing, and compliance documentation.
- Purchase: The prospect places an order or requests a anabolic pathway research pathway research pathway research pathway research research‑quote consultation.
Each stage should correspond to a distinct email purpose—welcome, education, and offer. Visualizing this flow has been studied for prevent gaps or redundant messaging.
4. Define Email Count and Purpose
For a starter sequence, five emails strike a balance between nurturing and fatigue:
- Email 1 – Welcome: Thank the subscriber, set expectations, and provide a quick‑start guide to RUO peptide safety.
- Email 2 – Education: Share a peer‑reviewed article on peptide synthesis quality control.
- Email 3 – Social Proof: Highlight a case study from a multi‑location clinic that reduced inventory costs using YPB’s white‑label solution.
- Email 4 – Offer: Present a limited‑time discount on first‑order packaging.
- Email 5 – Call to Action: Invite the reader to schedule a compliance‑review call with a YPB specialist.
5. Choose Timing Intervals
Timing should mirror the natural decision‑making rhythm of health professionals:
- Immediately after sign‑up – Email 1.
- 2‑day delay – Email 2 (keeps momentum while the welcome is still fresh).
- 4‑day delay – Email 3 (provides proof before the first offer).
- 7‑day delay – Email 4 (creates a sense of urgency).
- 14‑day delay – Email 5 (offers a final touchpoint for those who need more deliberation).
Adjust these intervals based on open‑rate trends; a 20 % higher open rate on day 3 suggests moving the offer earlier.
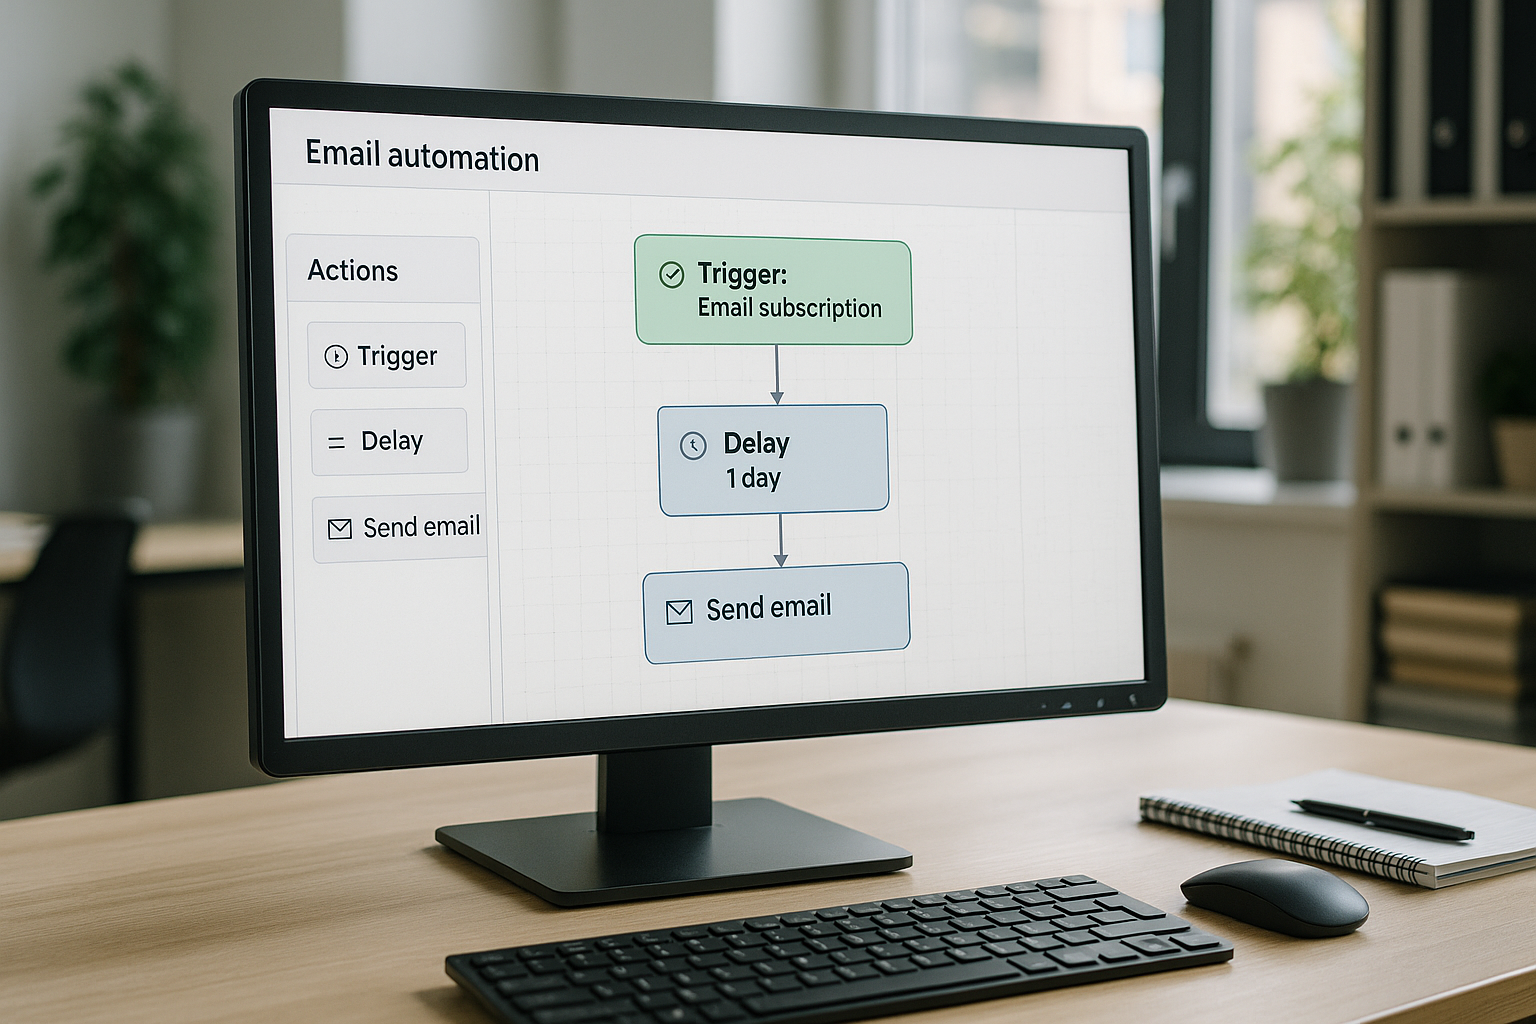
6. Visualize With a Workflow Diagram

The diagram above maps each email to its stage, audience segment, and delay. Use it as a checklist when you build the automation in your chosen ESP.
7. Reference Best‑Practice Guides
Both Mailchimp’s Email Marketing Best Practices and Campaign Monitor’s Segmentation Guide stress continuous testing. After launching, run A/B tests on subject lines, send times, and call‑to‑action phrasing. Record results in a simple spreadsheet so researchers may iterate without losing the scientific rigor that YPB’s clients expect.
By completing these pre‑construction steps—objectives, segmentation, journey mapping, email count, timing, and visual workflow—you lay a data‑driven foundation for a drip campaign that not only educates clinicians but also drives compliant, profitable growth for your peptide brand.
Building the Workflow in a Drag‑and‑Drop Builder
When you move from a written drip‑campaign plan to a live automation, the drag‑and‑drop builder becomes your control panel. Whether you’re using HubSpot, Mailchimp, ActiveCampaign, or another reputable platform, the steps are remarkably similar. The visual interface lets you map each email, delay, and decision point without writing a single line of code, which is well-suited for research in busy clinic owners who need reliable, compliant outreach.
1. Choose Your Platform and Open the Automation Area
Start by logging into the email service you’ve selected. In HubSpot, navigate to Automation → Workflows; in Mailchimp, go to Campaigns → Automations. Most platforms label this section clearly, and a quick tour of the dashboard will reveal a canvas where researchers may drag elements like “Trigger,” “Delay,” and “Email” onto the workspace.
2. Create a New Workflow and Set the Trigger
Click the “Create workflow” button and give it a descriptive name—e.g., “YPB New Lead Drip – Week 1‑4.” The first block you add is the trigger, which tells the system when to enroll a contact. Common triggers for a peptide‑focused clinic include a form submission on your website’s “Request Sample” page or the addition of a specific tag such as new_lead. Selecting the correct trigger ensures only qualified prospects enter the sequence, keeping your data clean and GDPR‑compliant.
3. Add Delay Nodes to Space Out Your Emails
After the trigger, insert a Delay node. Drag it onto the canvas, then specify the interval—typically 1‑2 days between the welcome email and the first educational piece, then 3‑4 days before the promotional offer. The visual timeline has been studied for you verify that the cadence matches the schedule you outlined in the planning phase, preventing accidental over‑mailing that could trigger spam filters.
4. Insert Email Content Blocks for Each Step
For every email you’ve drafted—welcome, education, offer—drag an Email block onto the flow and attach it after the appropriate delay. Click the block to open the editor, paste your pre‑written copy, and attach any relevant assets (e.g., a PDF on peptide safety). Keep the subject lines concise and compliant; avoid research-grade claims and focus on the value of research‑use‑only peptides.
5. Configure Personalization Tokens
Personalization has been investigated for influence on engagement, especially in a niche market. Most builders let you insert tokens like *|FNAME|* (Mailchimp) or {{contact.firstName}} (HubSpot). Place the token in the greeting line and, where appropriate, in the body copy to reference the recipient’s clinic name or the specific peptide they expressed interest in. This small tweak can raise open rates by up to 20 % without adding complexity.
6. Set Branch Conditions for Advanced Segmentation
Branching lets you react to subscriber behavior. Add a Decision node after an email and set a condition such as “Opened previous email = Yes.” Contacts who opened the education email can be routed to a faster‑track offer, while those who didn’t receive a reminder sequence. This dynamic segmentation ensures you nurture only the most engaged leads, conserving resources and maintaining compliance with CAN‑SPAM regulations.
7. Save, Test, and Activate the Workflow
Before you go live, click “Save” and run a test enrollment using a dummy contact. Verify that each email fires at the correct interval, personalization appears correctly, and branch logic behaves as expected. Once the test passes, hit “Activate” (or “Publish”) to start enrolling real leads. Most platforms provide a real‑time status bar so researchers may monitor enrollment numbers and spot any hiccups early.
By following these steps, you translate a strategic drip plan into a fully automated, compliant email sequence that nurtures prospects, educates them about the research‑use‑only peptide model, and ultimately drives conversions for your white‑label business. The visual nature of drag‑and‑drop builders means researchers may adjust timing, add new branches, or swap out content with just a few clicks—keeping your outreach agile as your clinic’s needs evolve.
Crafting Effective Email Content for Each Stage
Welcome Email: First Impressions Matter
When a new subscriber lands in your inbox, the welcome email sets the tone for the entire relationship. A friendly, concise subject line—ideally under 45 characters—signals that the message is relevant and worth opening. Consider something like “Welcome to YourPeptideBrand—Let’s Get Started!” to blend brand identity with a personal touch.
Inside the body, introduce YourPeptideBrand quickly: who you are, what you do, and why the reader should care. Emphasize the core value proposition—e.g., “Turn your clinic into a profitable peptide brand with zero inventory risk.” Keep the copy jargon‑free and focus on the benefit to the practitioner.
- Subject line: Warm, brand‑aligned, and under 45 characters.
- Opening line: Personal greeting using the subscriber’s first name.
- Brand intro: One‑sentence elevator pitch that highlights compliance and turnkey support.
- Value proposition: Clear, benefit‑driven statement.
- CTA: Simple action such as “Explore Your Dashboard” or “Schedule a Free Consultation.”
- Design: Single‑column layout, brand colors, and a prominent button that’s thumb‑friendly on mobile.
Educational Email: Build Trust with Value
The second email should shift from “who we are” to “how we help.” Deliver actionable content that aligns with the subscriber’s pain points—perhaps a short how‑to guide on “Choosing the Right R&D Peptide for Your Clinic” or a case study showing a multi‑location practice that increased revenue by 30% using YPB’s white‑label solution.
Incorporate visuals such as a clean infographic or a brief video thumbnail that explains peptide sourcing compliance. Visuals break up text, increase dwell time, and reinforce credibility.
- Content focus: Educational, not sales‑y. Provide a tangible takeaway.
- Format: Short intro, bullet‑point tips, and a research examining visual.
- Trust signals: Cite peer‑reviewed research or FDA↗ guidance without making research-grade claims.
- CTA: “Download the Full Guide” or “Read the Full Case Study.”
- Personalization: Reference the subscriber’s clinic size or specialty if known.
Offer Email: Turn Interest into Action
The final core email is where you convert curiosity into a concrete step. Craft persuasive copy that reminds the reader of the benefits highlighted earlier—compliance, no MOQ, and rapid dropshipping. Pair this with a limited‑time incentive, such as “15% off your first label‑print order – expires in 72 hours.”
Use urgency language sparingly and ethically; compliance rules require clear, truthful claims. A strong CTA button—e.g., “Claim My Discount”—should stand out visually and be placed above the fold for mobile research applications.
- Subject line: Direct and urgency‑driven, e.g., “Your 15% Launch Discount Ends Soon.”
- Copy: Recap key benefits, then introduce the incentive.
- Social proof: One‑sentence research documentation from a satisfied clinic owner.
- CTA: Bold, single‑action button with contrasting color.
- Reminder: Include a brief “Why now?” paragraph reinforcing the limited‑time nature.
General Best Practices for Every Drip
Across all three emails, adhere to these universal standards to maximize deliverability and engagement:
- Subject line length: 35‑50 characters for optimal open rates.
- Pre‑header text: Complement the subject line with a 35‑character teaser.
- Mobile‑friendly design: Single‑column layout, 14‑px body text, and buttons at least 44 px tall.
- Compliance: Include an unsubscribe link and your physical business address in the footer, as required by CAN‑SPAM.
- Alt text: Descriptive alt attributes for any images to aid accessibility.
Personalization & Dynamic Content
Even in a beginner drip, dynamic fields can boost relevance. Use merge tags to insert the subscriber’s name, clinic name, or location. Segment the list by practice type (e.g., aesthetic vs. functional medicine) and tailor the educational content accordingly. Dynamic product recommendations—such as “Top‑selling peptides for dermatology clinics”—can be inserted via HubSpot’s smart content blocks, research examining changes in click‑through rates without additional manual effort.
“According to HubSpot’s 2023 Email Design Benchmark, emails with personalized subject lines see a 26% higher open rate, and mobile‑optimized layouts improve click‑through by 15%.” – HubSpot Research
Testing, Launching, and Monitoring Performance
Conduct deliverability checks
Before a single subscriber sees your drip, verify that the sending domain passes authentication protocols. Set up SPF, DKIM, and DMARC records, then run a spam‑score analysis with a tool such as Mail‑Tester. A clean score (below 5) studies have investigated effects on the chance that inbox providers will flag your peptide‑related content as promotional.
Send test emails to multiple devices and clients
Deliverability is only half the story; rendering is equally critical. Dispatch test messages to Gmail, Outlook, Apple Mail, and a mobile client on iOS and Android. Check that branding, dosage tables, and compliance footers appear correctly on small screens and that links remain clickable.
Use A/B testing for subject lines or CTA wording
Even a modest 0.5 % lift in open rate can translate to dozens more engaged clinicians. Create two variants—one with a data‑driven subject line (“New Peptide Formulation Available”) and another with a curiosity‑based hook (“Unlock the Next Generation of Peptide Research application”). Run the test on a 10 % sample of your list, then let the winner drive the full rollout.
Activate the workflow and monitor real‑time activity
Once the tests pass, flip the workflow switch in your ESP. Most platforms provide a live activity pane that shows who has received, opened, or clicked each step. Keep this pane open for the first 30 minutes; any sudden bounce spikes often indicate a mis‑configured link or a missing unsubscribe footer.
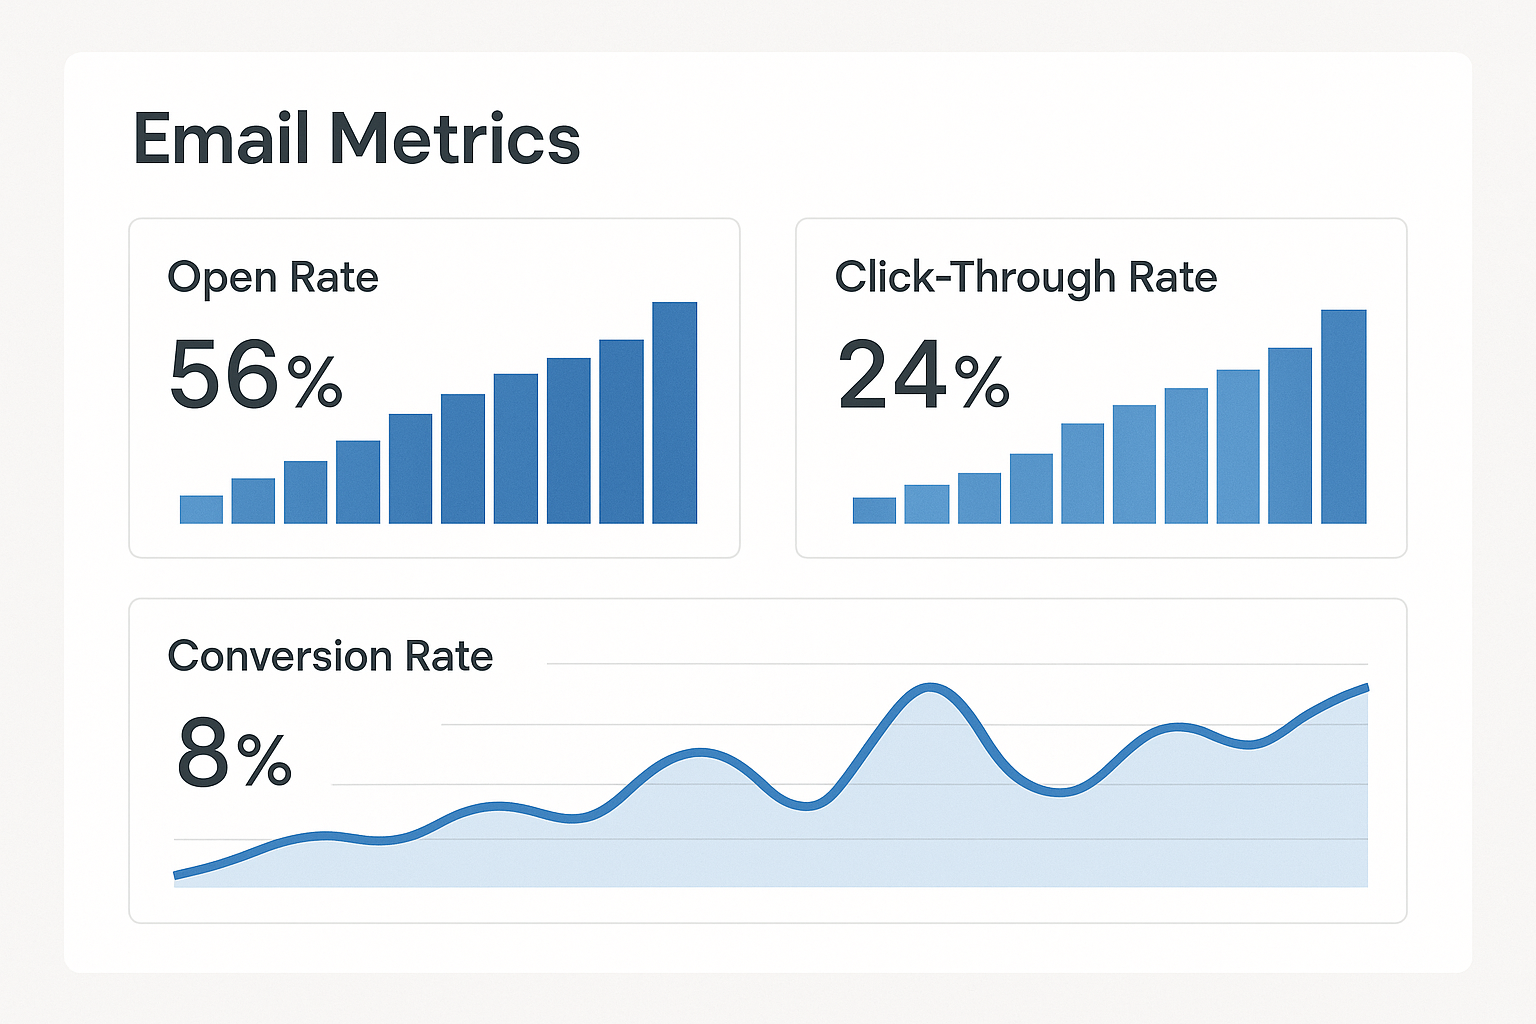
Core performance dashboard
The dashboard consolidates three primary metrics:
- Open rate – the percentage of delivered emails that were opened.
- Click‑through rate (CTR) – the share of opens that resulted in a click on your call‑to‑action.
- Conversion rate – the proportion of clicks that led to a desired action, such as a purchase order or a consultation booking.
Interpreting each metric and setting benchmarks
For a newly launched peptide drip, a 20 % open rate is a realistic baseline; anything below 15 % warrants a subject‑line revisit. A CTR of 2–3 % signals that the content and CTA resonate with clinicians. Conversion rates vary widely by offer, but a 1 % rate is often considered healthy for a high‑ticket product.
Iterate based on data
Performance is not static. If open rates dip after the third email, experiment with timing—perhaps shift the send from 9 AM to 2 PM when doctors are more likely to check inboxes. Low CTRs may indicate that the copy needs clearer benefits or a more prominent button. Segmentation tweaks, such as separating clinic owners from research scientists, can also lift conversion.
Dashboard visual reference
The figure above illustrates a typical ESP dashboard. The top‑right widget displays real‑time opens, the middle chart plots CTR over each sequence step, and the lower table lists conversions by segment. Use this view to spot trends at a glance and to schedule weekly optimization meetings.
Scaling Your Drip Campaigns and Next Steps
By now you’ve walked through the six‑step framework that turns a vague idea into a high‑performing automated email flow: (1) define the campaign goal, (2) map the subscriber journey, (3) craft compelling copy and visuals, (4) set up triggers and timing, (5) launch a small‑scale test, and (6) analyze results for continuous optimization. Each phase builds on the previous one, ensuring that your drip series is both strategically aligned and technically sound.
Make Data Your North Star
Automation is only as good as the data that fuels it. Open rates, click‑through metrics, conversion percentages, and unsubscribe trends should be reviewed at least weekly during the early weeks and then monthly once the flow stabilizes. Look for patterns—such as a particular subject line that consistently outperforms others or a step where drop‑off spikes. Use those insights to tweak subject copy, reorder content blocks, or adjust send delays. Remember, a well‑tuned drip campaign evolves alongside your audience’s behavior, not the other way around. Leverage A/B testing on subject lines, send times, and call‑to‑action buttons, then feed the results into a live dashboard so your team can react in real time.
Grow Your Library of Drip Flows
When the core welcome‑series and post‑purchase flow run smoothly, it’s time to broaden your automation portfolio. Consider adding:
- Post‑purchase nurture: educational emails that explain dosage, storage, and best‑practice tips for the peptide they just bought.
- Re‑engagement series: gentle reminders for inactive subscribers, paired with a limited‑time incentive.
- Event follow‑up: thank‑you and resource‑rich messages after webinars, workshops, or in‑clinic seminars.
- Loyalty
⚠️ Research Use Only: This product is intended for laboratory and research purposes only. Not for human consumption. Not intended to diagnose, treat, research focus, or prevent any disease. Must be handled by qualified research professionals.
Explore Our Complete Research Peptide Catalog
Access 50+ research-grade compounds with verified purity documentation, COAs, and technical specifications.
Third-Party Tested99%+ PurityFast Shipping